YOUR PRINTPAL IN BUSINESS

  • Email: sales@printpallondon.co.uk
  • Visit Us: 14 Hendon Lane, London, N3 1TR
  • Lets Talk: 020 8343 0099

Find out how to use Adobe Illustrator to create a sticker cut line.

Our Step By Step Guide

When ordering custom cut stickers (or any other product with a custom shape), you can hire one of our amazing designers to create the cut path around the shape of your artwork, or you can follow the instructions below to create this in Illustrator.

Standard sticker shapes such as oval, round, square, and rectangle do not need a cut path and will be applied by our team during the artwork approval step of your order.

When employing one of our designers to develop custom cut paths, the process can take up to 24 hours, so please keep this in mind if you have an urgent order that is due the same day. Our customer care representatives are always available to answer any inquiries you may have.

Is your artwork saved as a vector or
a raster (.png, .jpg, .jpeg, .gif, .tiff, .psd ?)

Vector Images

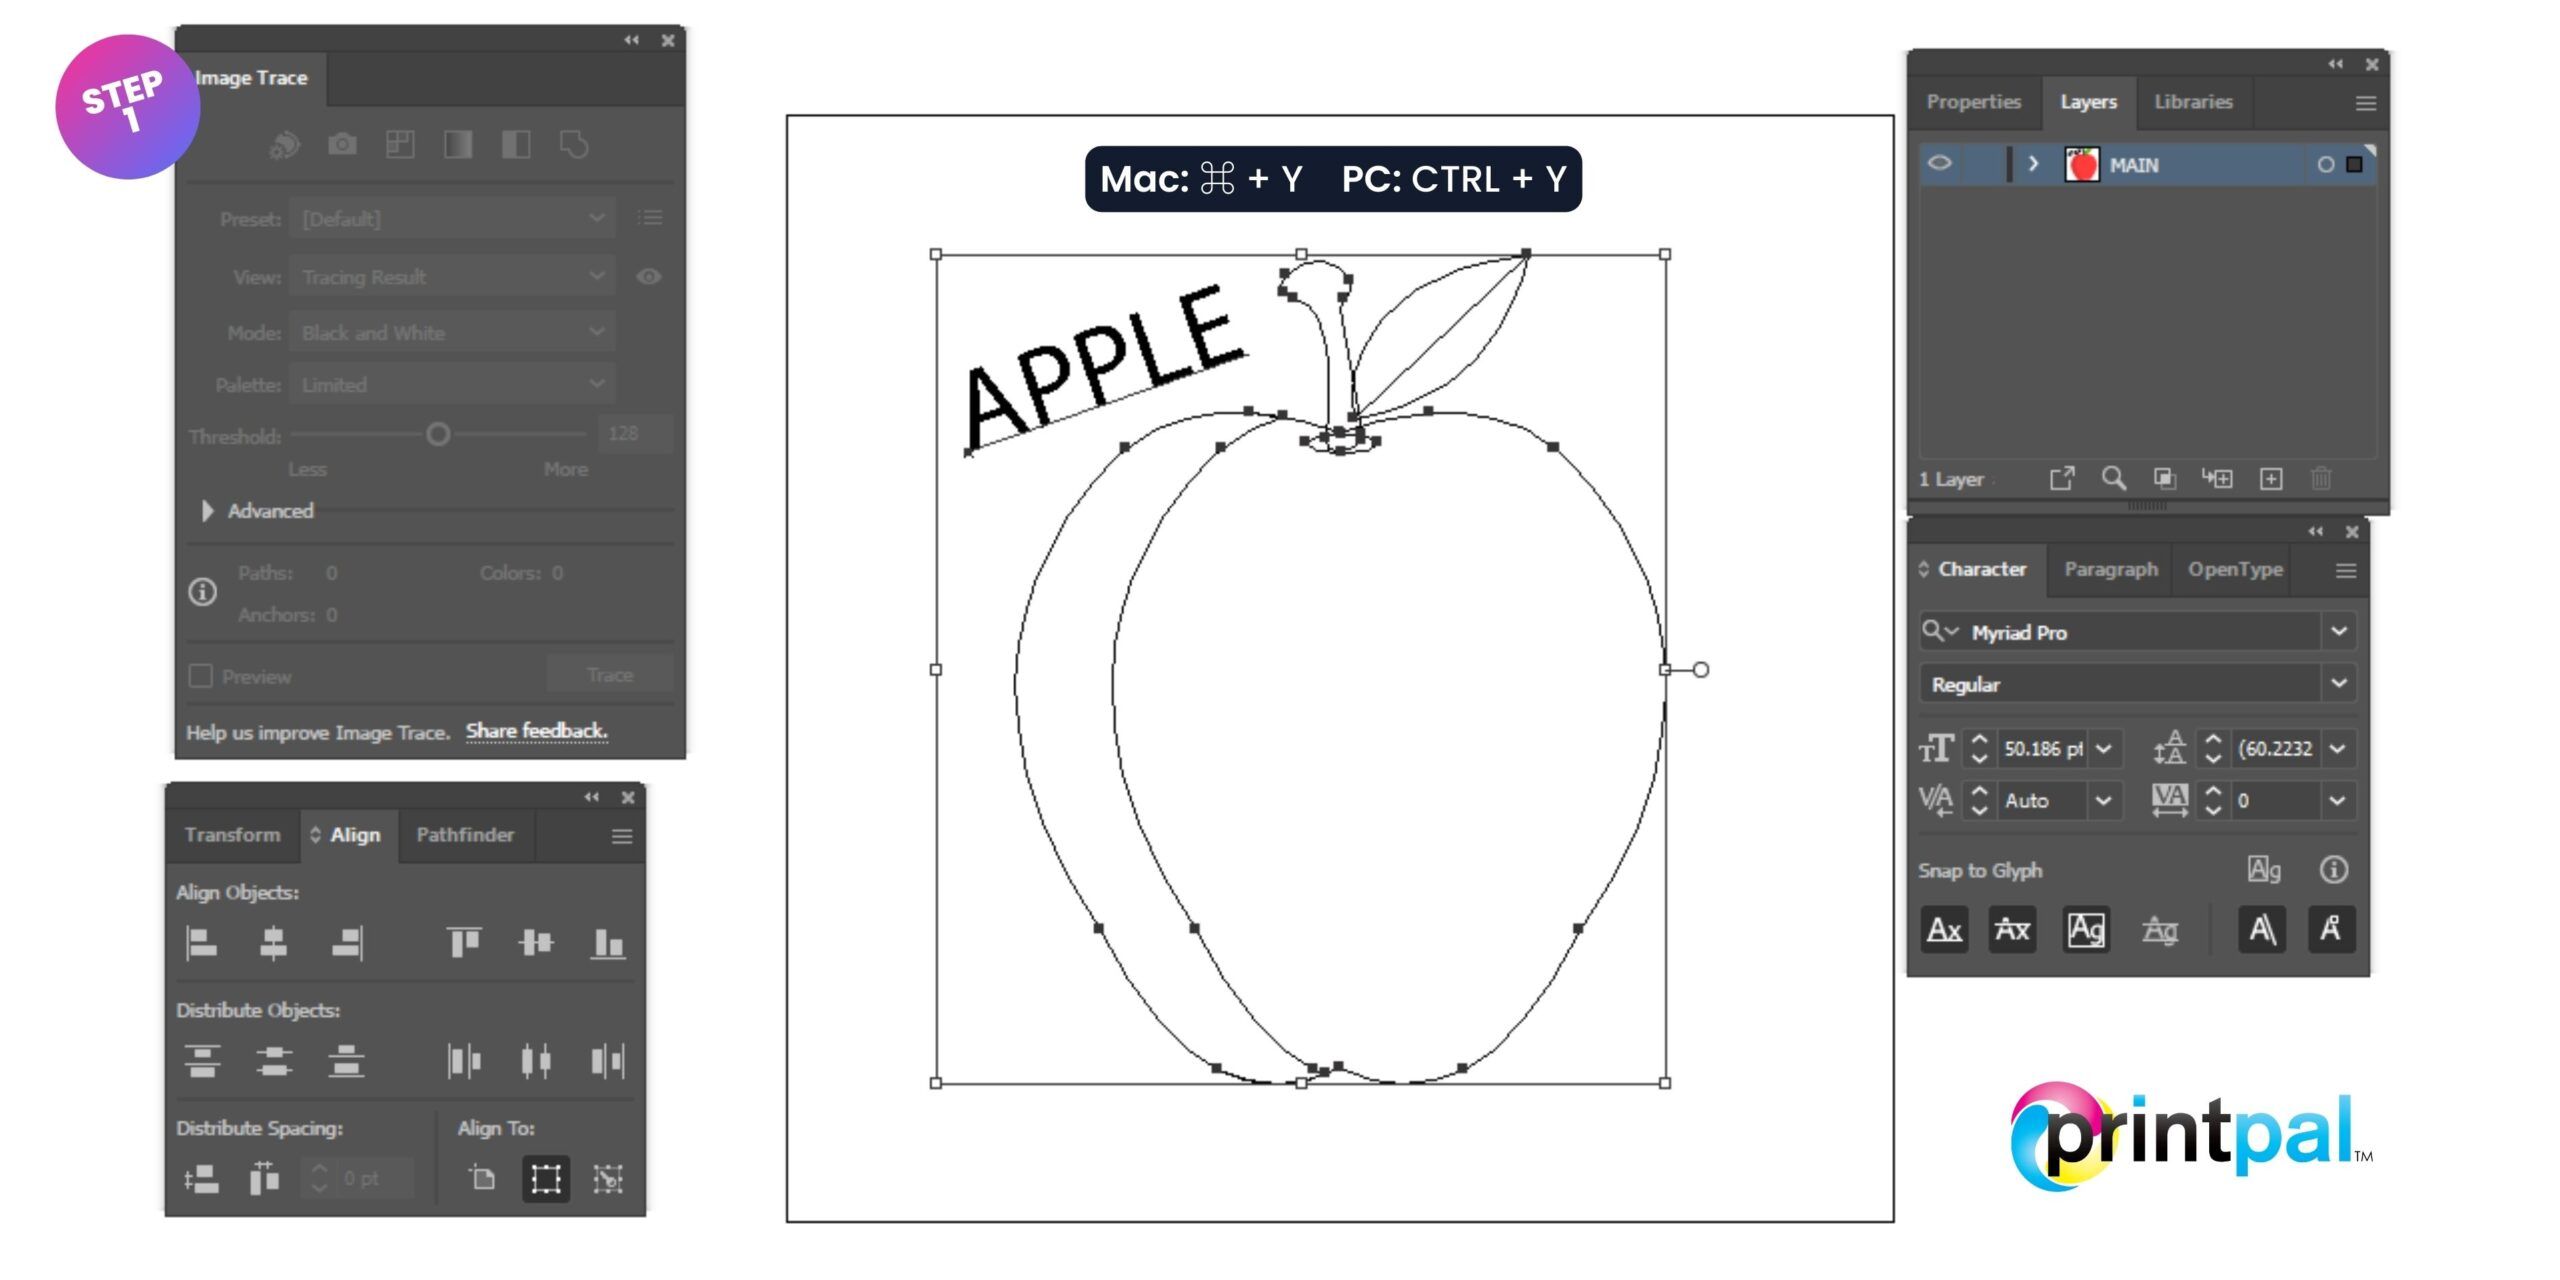
Step 1

  • Select any strokes that are present in your design while it is open in Adobe Illustrator.
  • You can use Outline view to locate strokes within your design.
    • Mac: ⌘ + Y
    • PC: CTRL + Y
Vector Cut Contour Step 1 scaled

Step 2

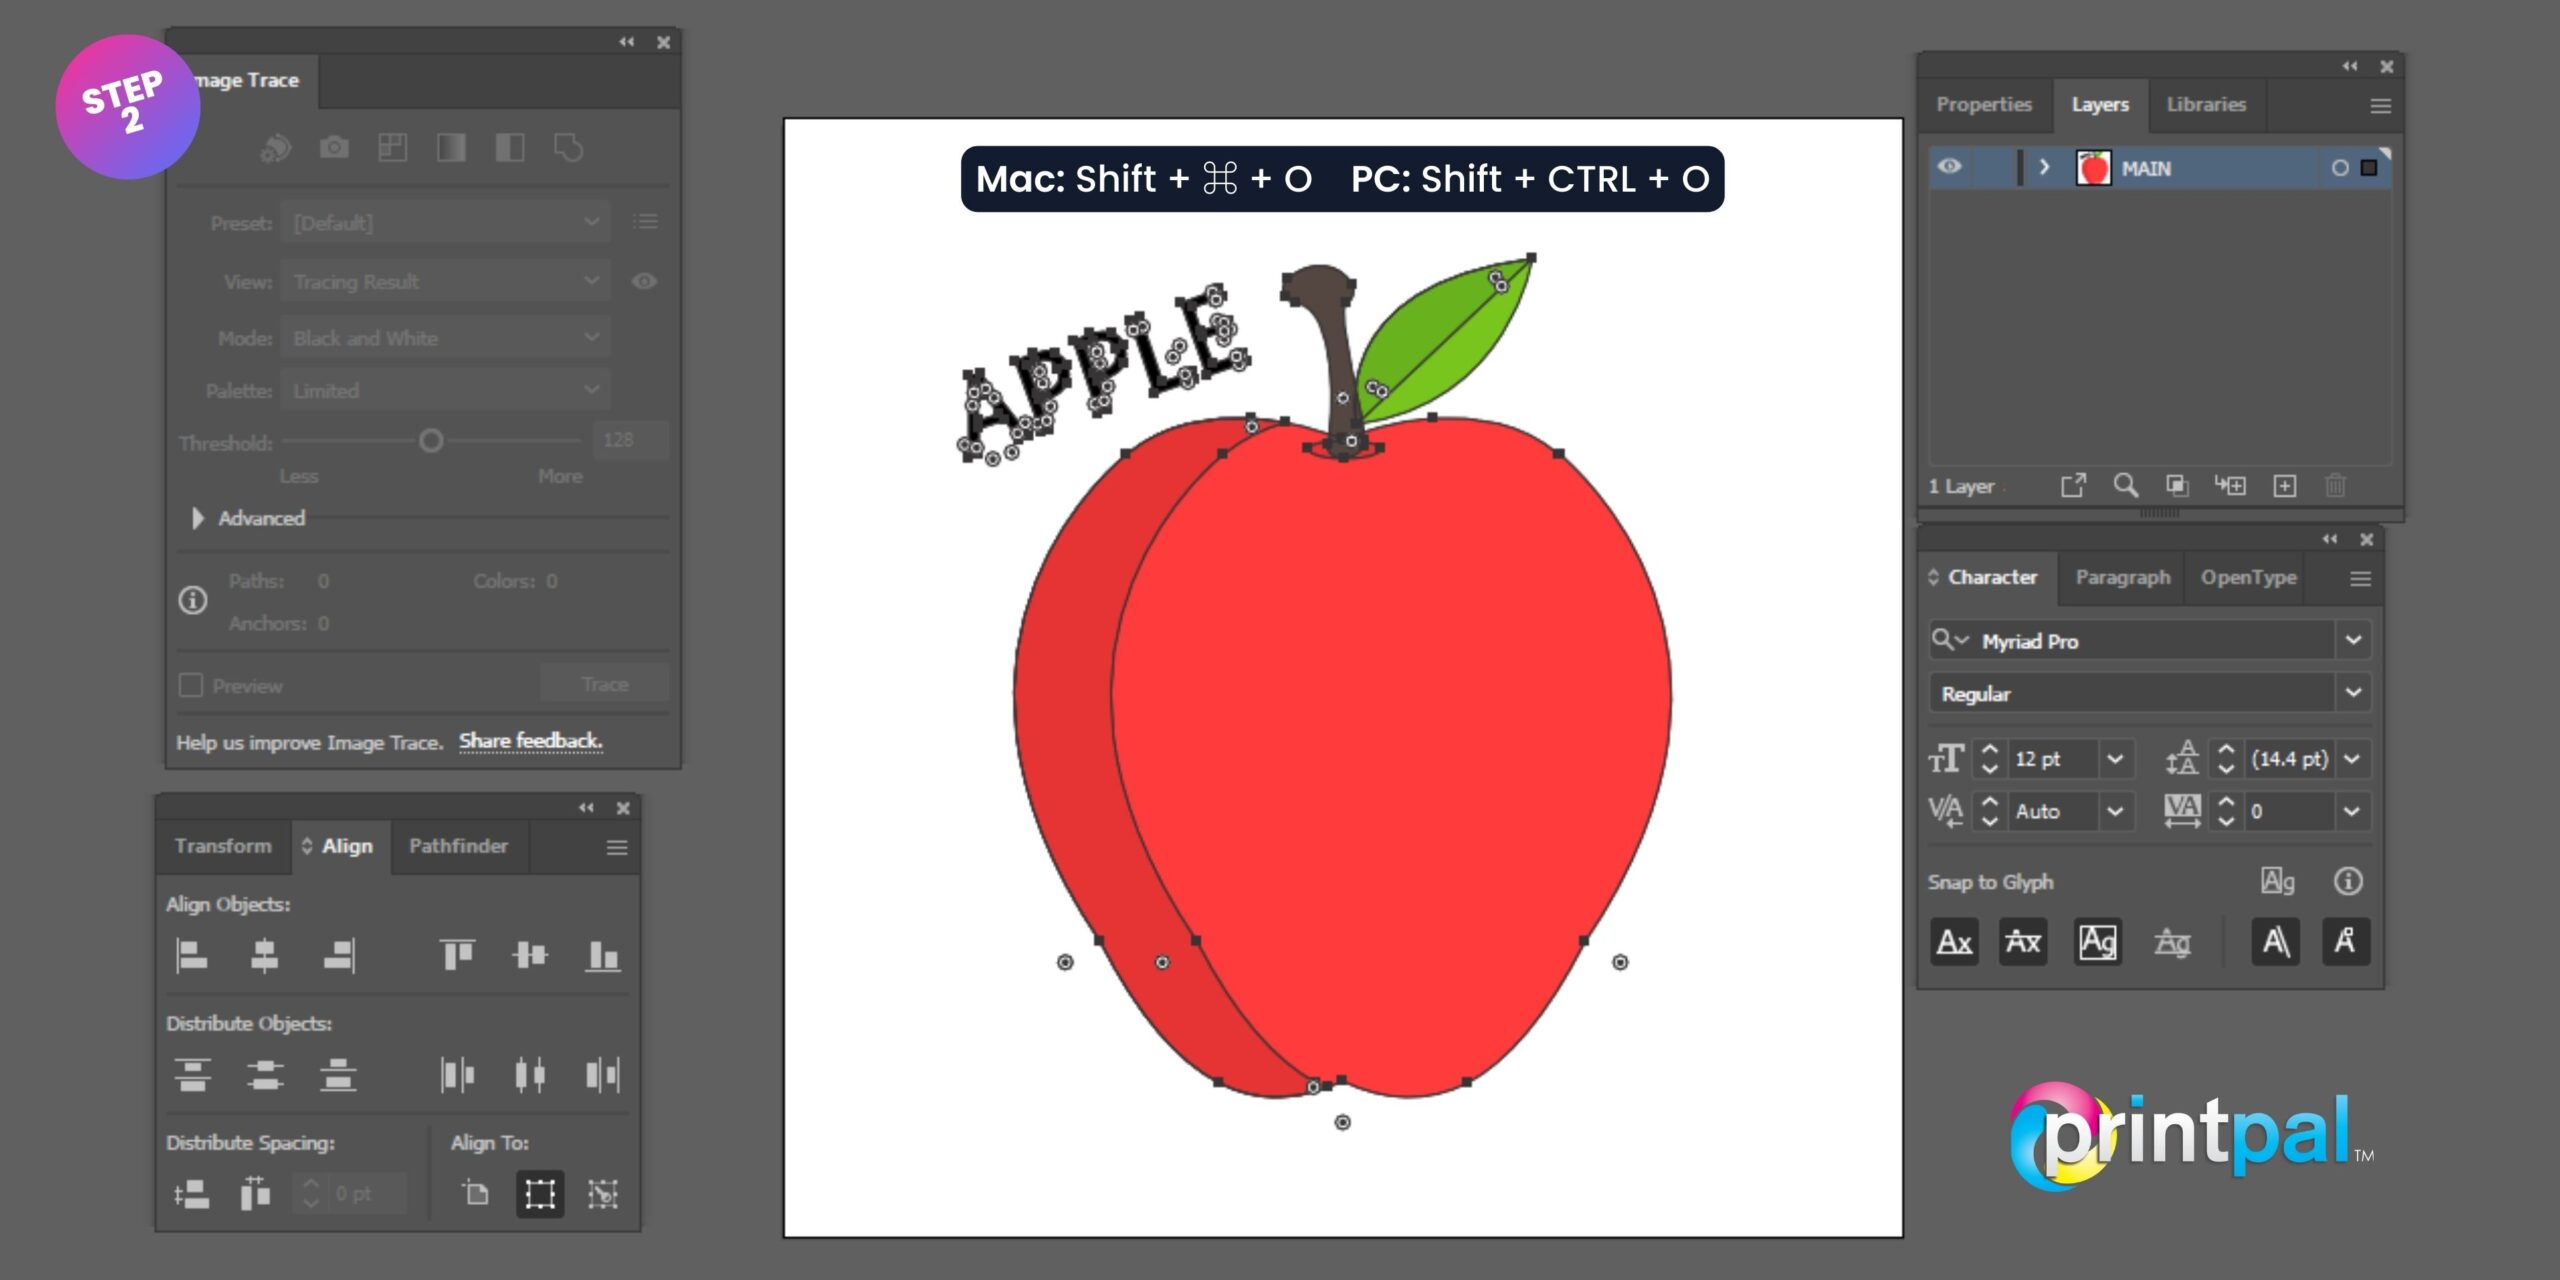
  • Make sure that all of the text in your design is selected.
  • After that, pick Create Outlines from the context menu when you right-click.
    • Mac: Shift + ⌘ + O
    • PC: Shift + Control + O
Vector Cut Contour Step 2 scaled

Step 3

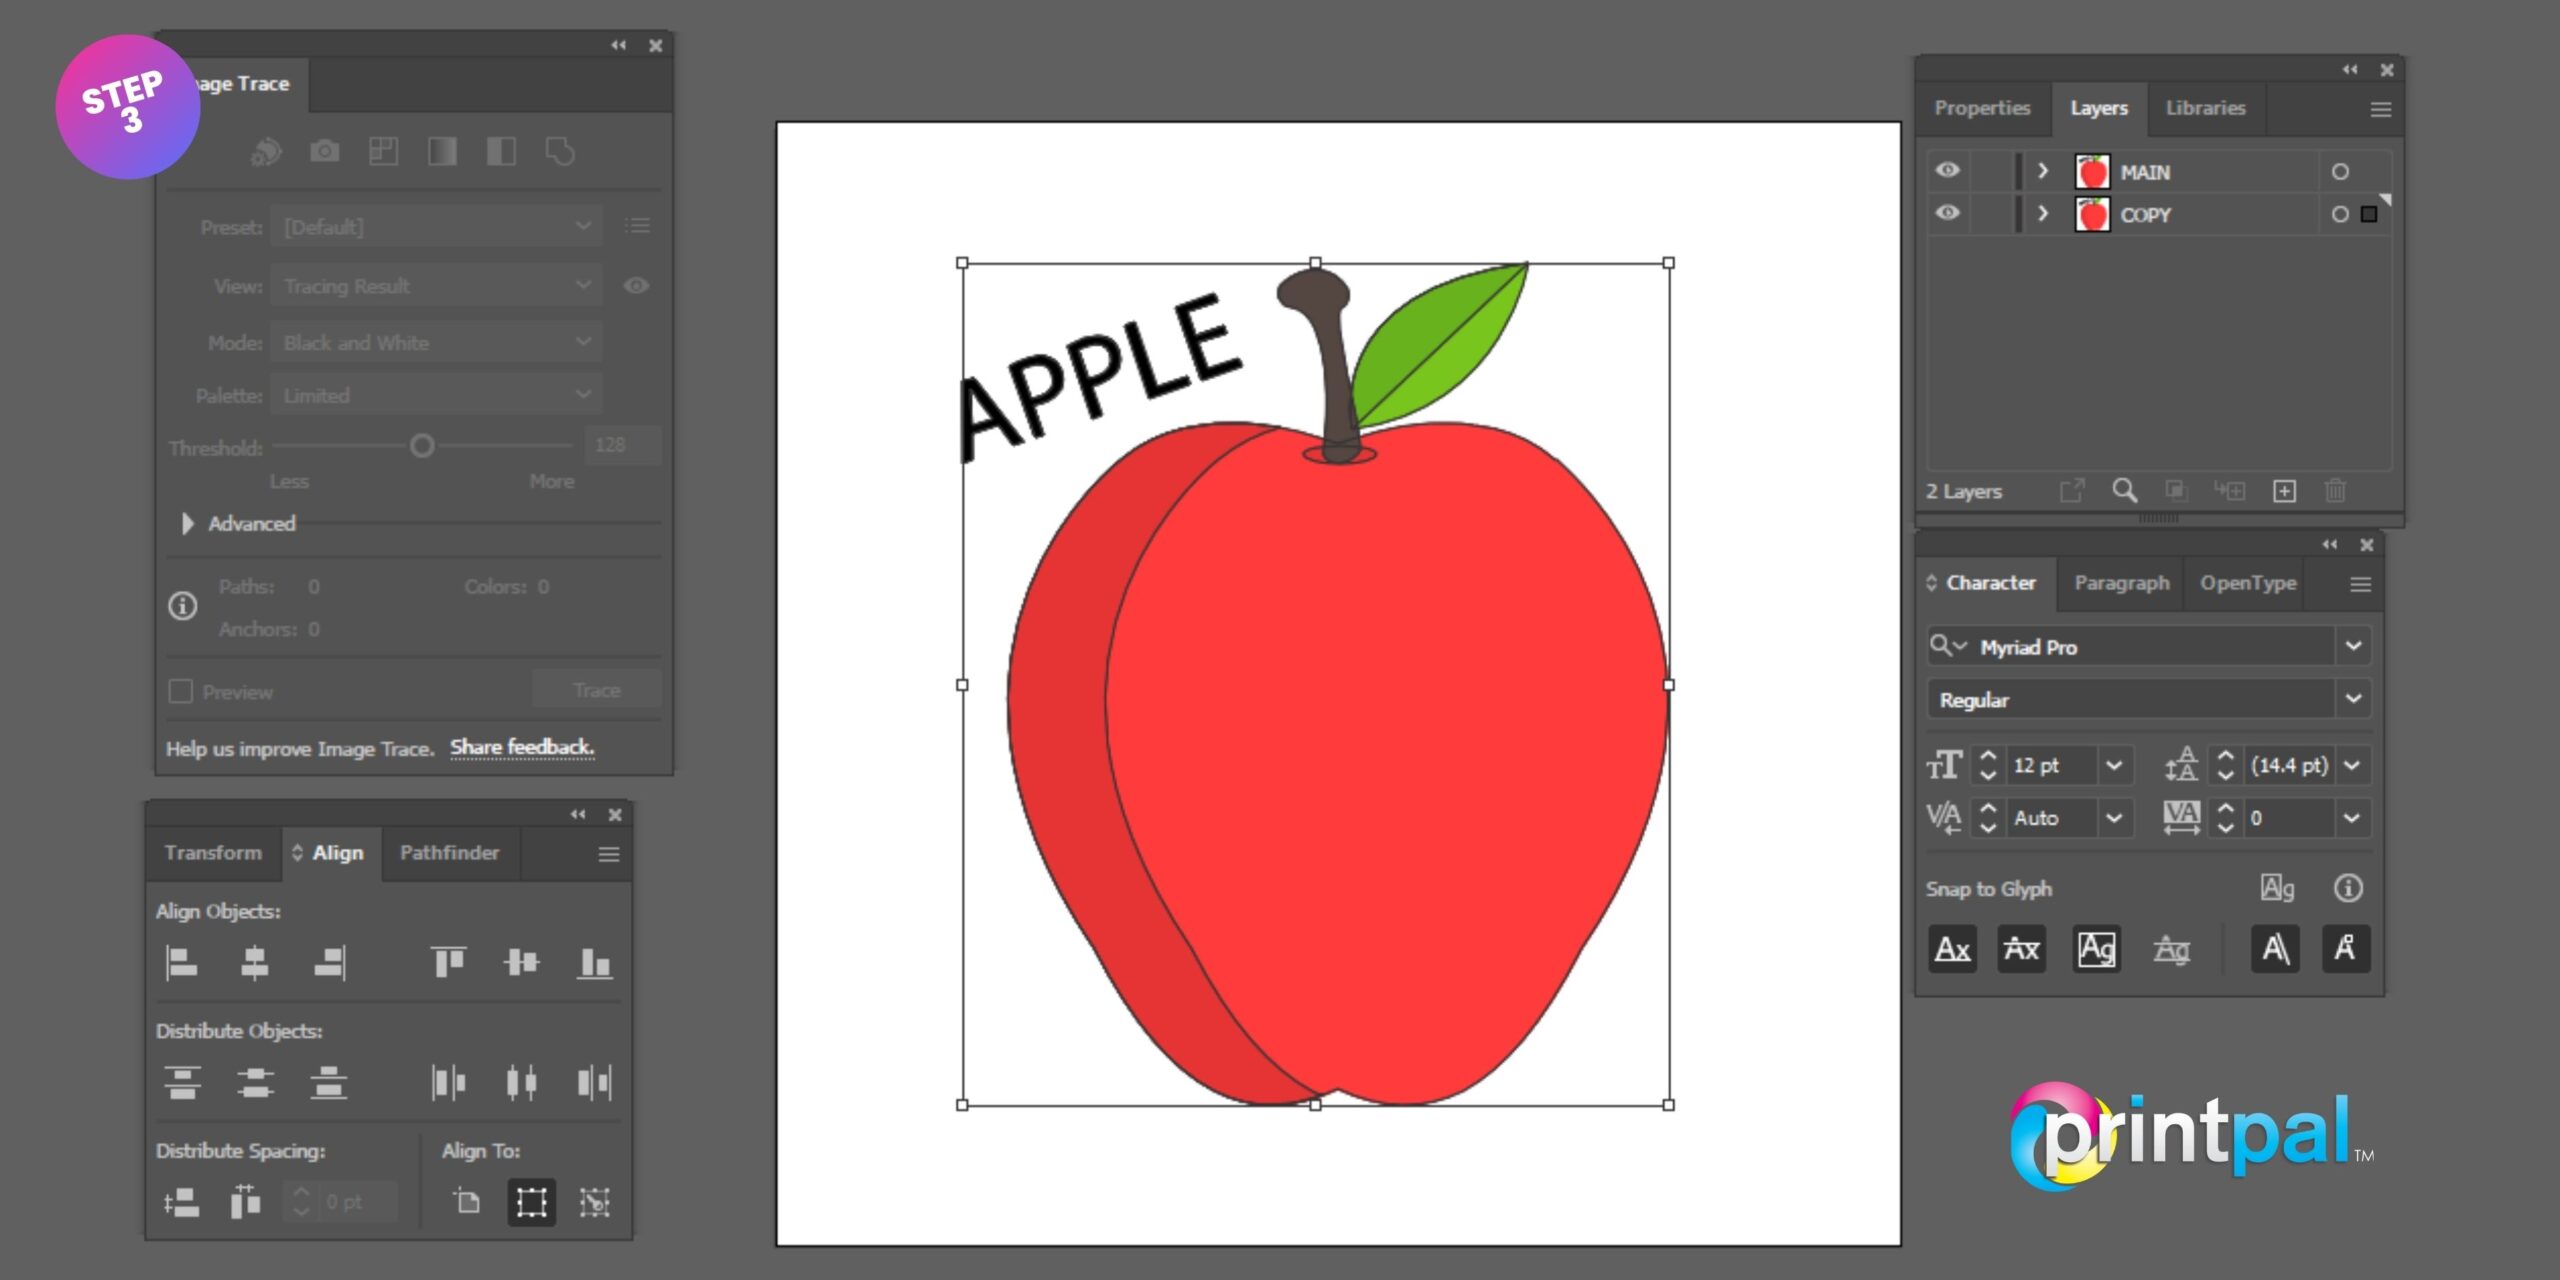
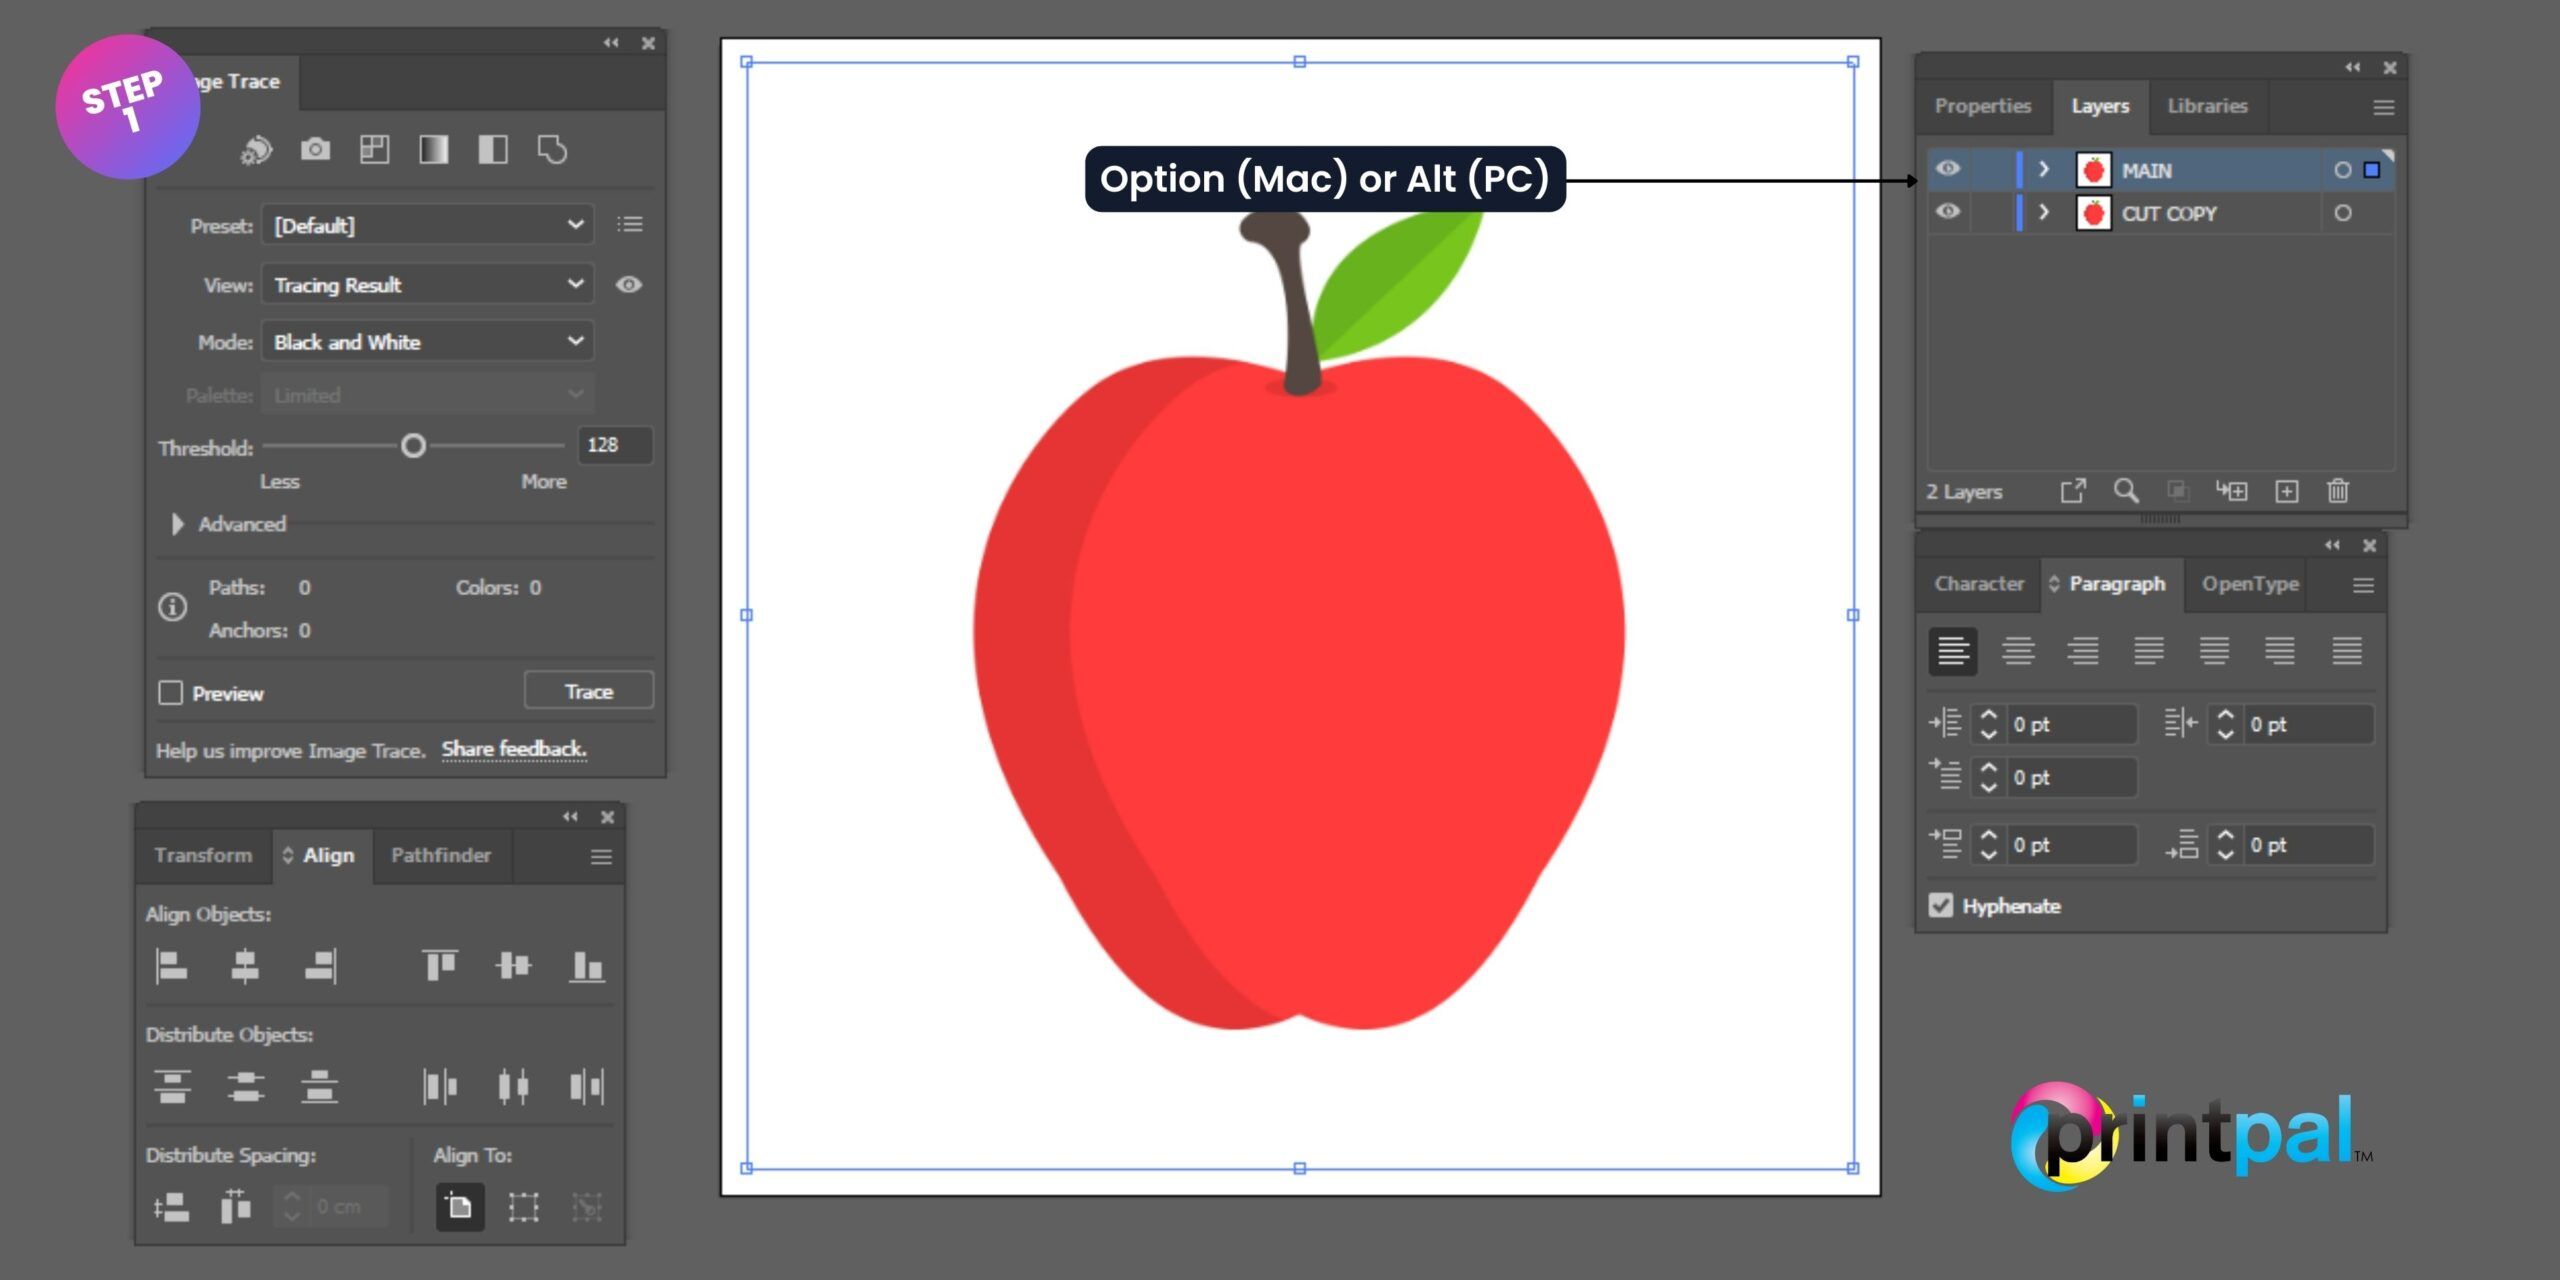
  • In the panel labelled “Layers,”
    • MAC: press and hold the Option key
    • PC:  Alt key
  • Duplicate the layer, easiest way of doing this is drag the layer of your artwork so it hovers on top of itself
  • This will create a new duplicate layer.
  • This is where you will create the cut line so you can lock the layer beneath.
Vector Cut Contour Step 3 scaled

Step 4

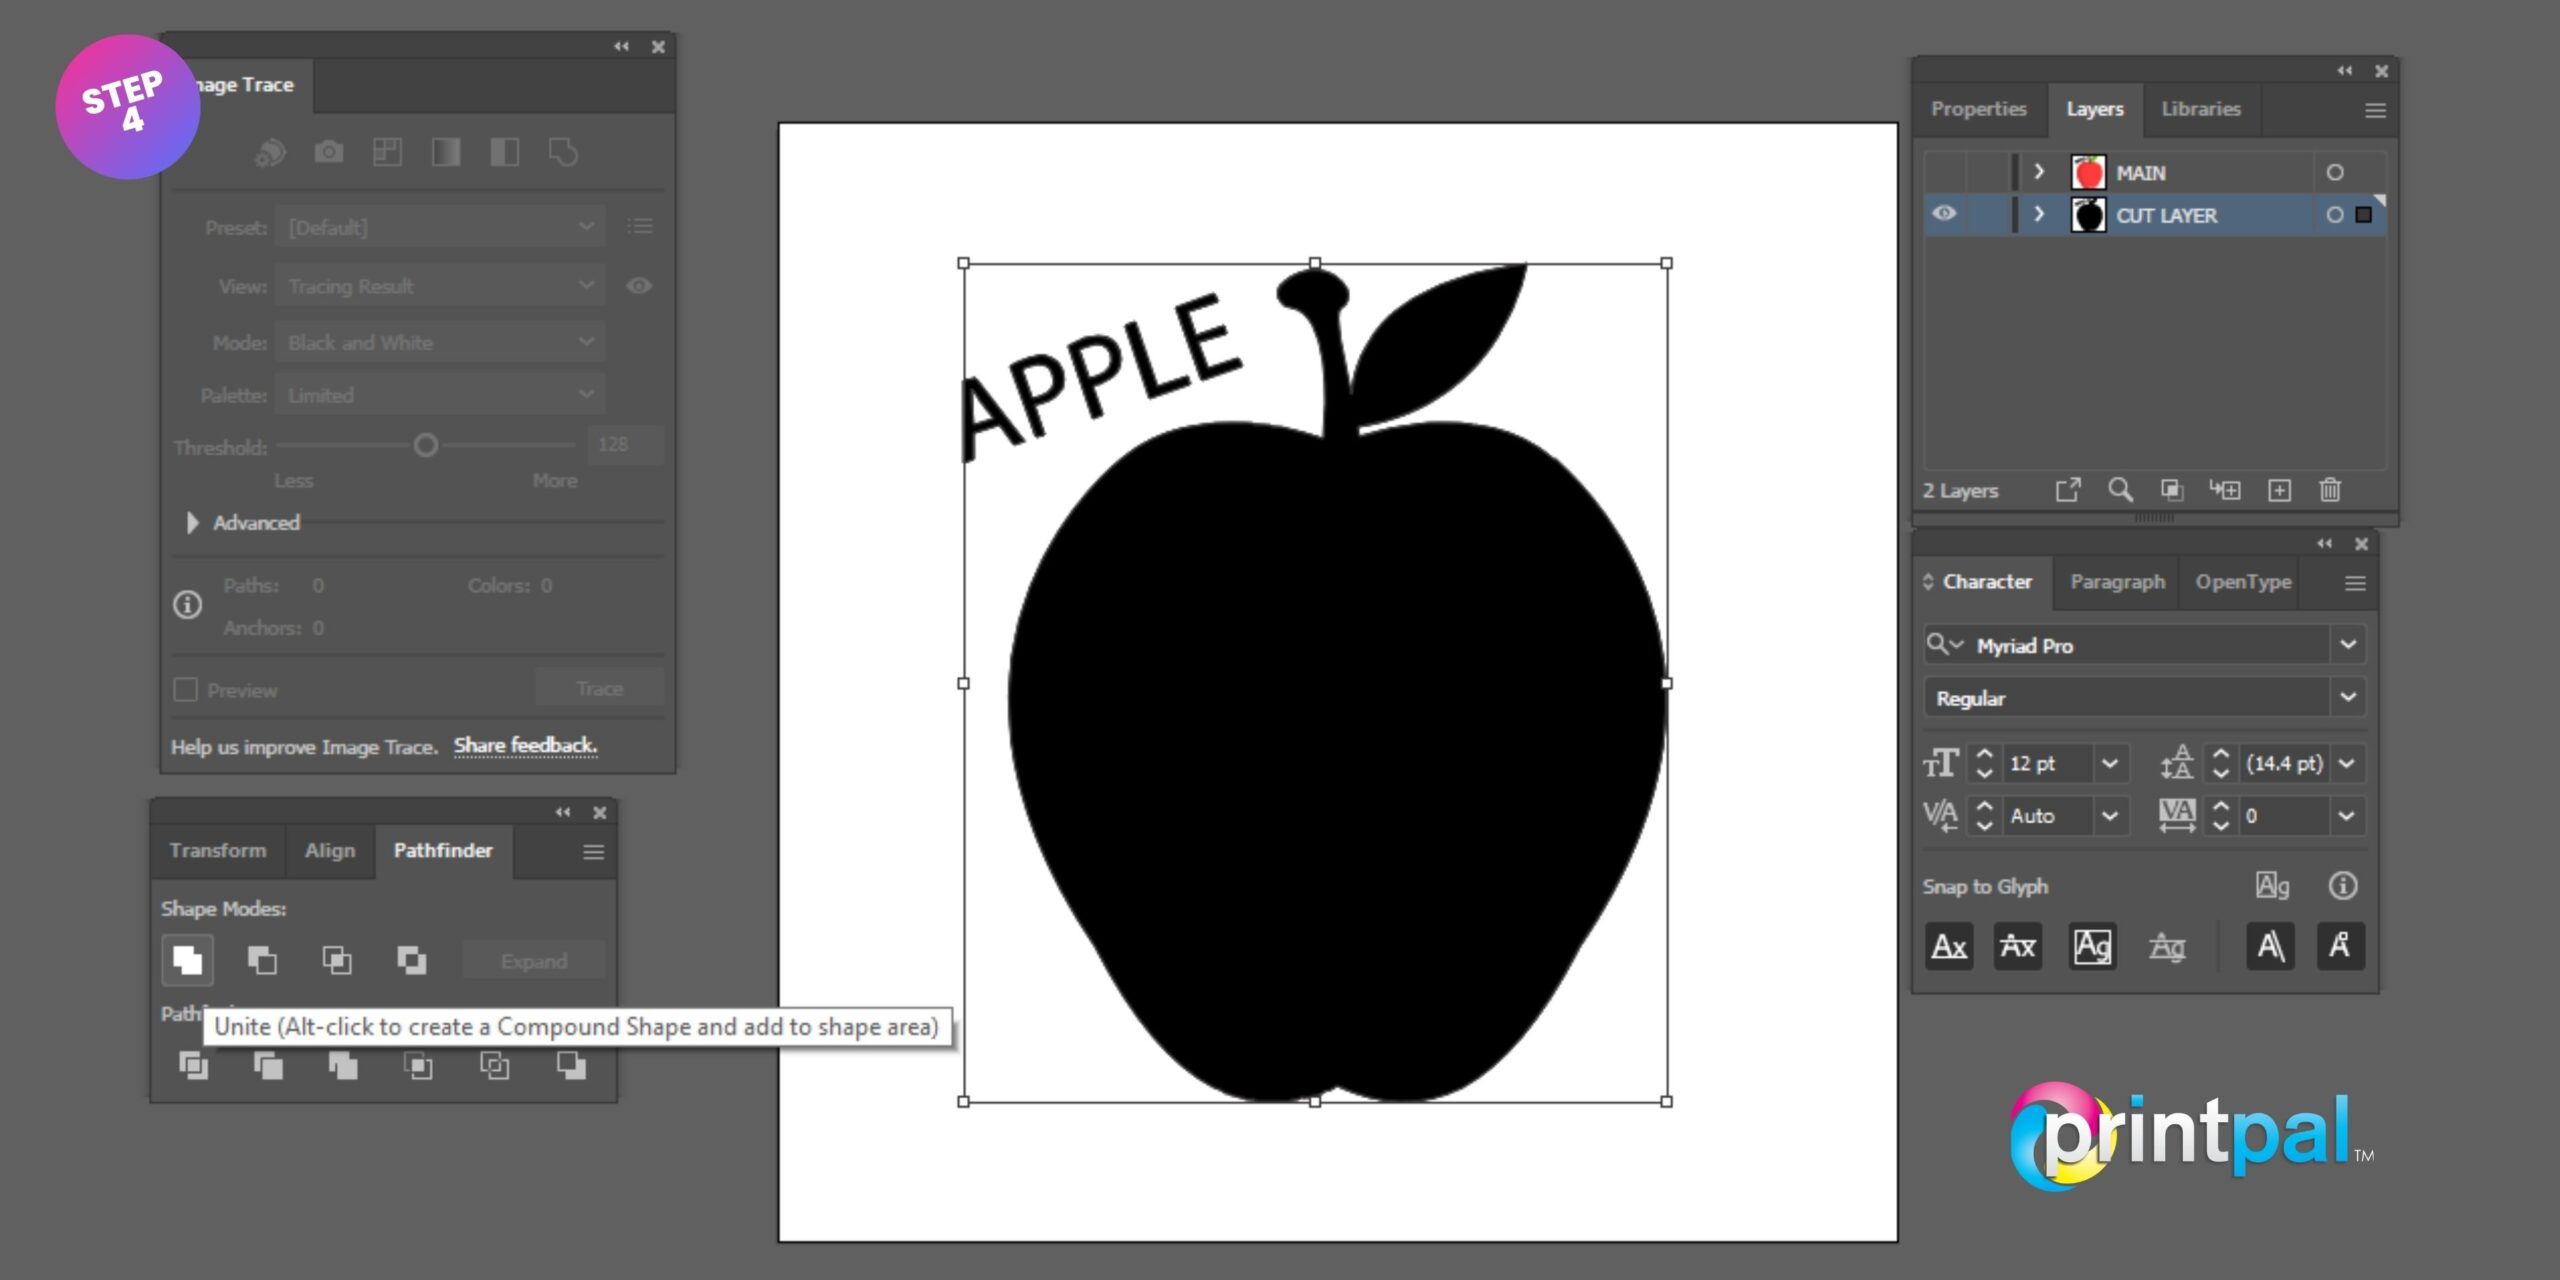
  • Select everything on the layer containing the cut line.
  • To convert the entire picture into a single form, choose the Unite icon within the Pathfinder window.
Vector Cut Contour Step 4 scaled

Step 5

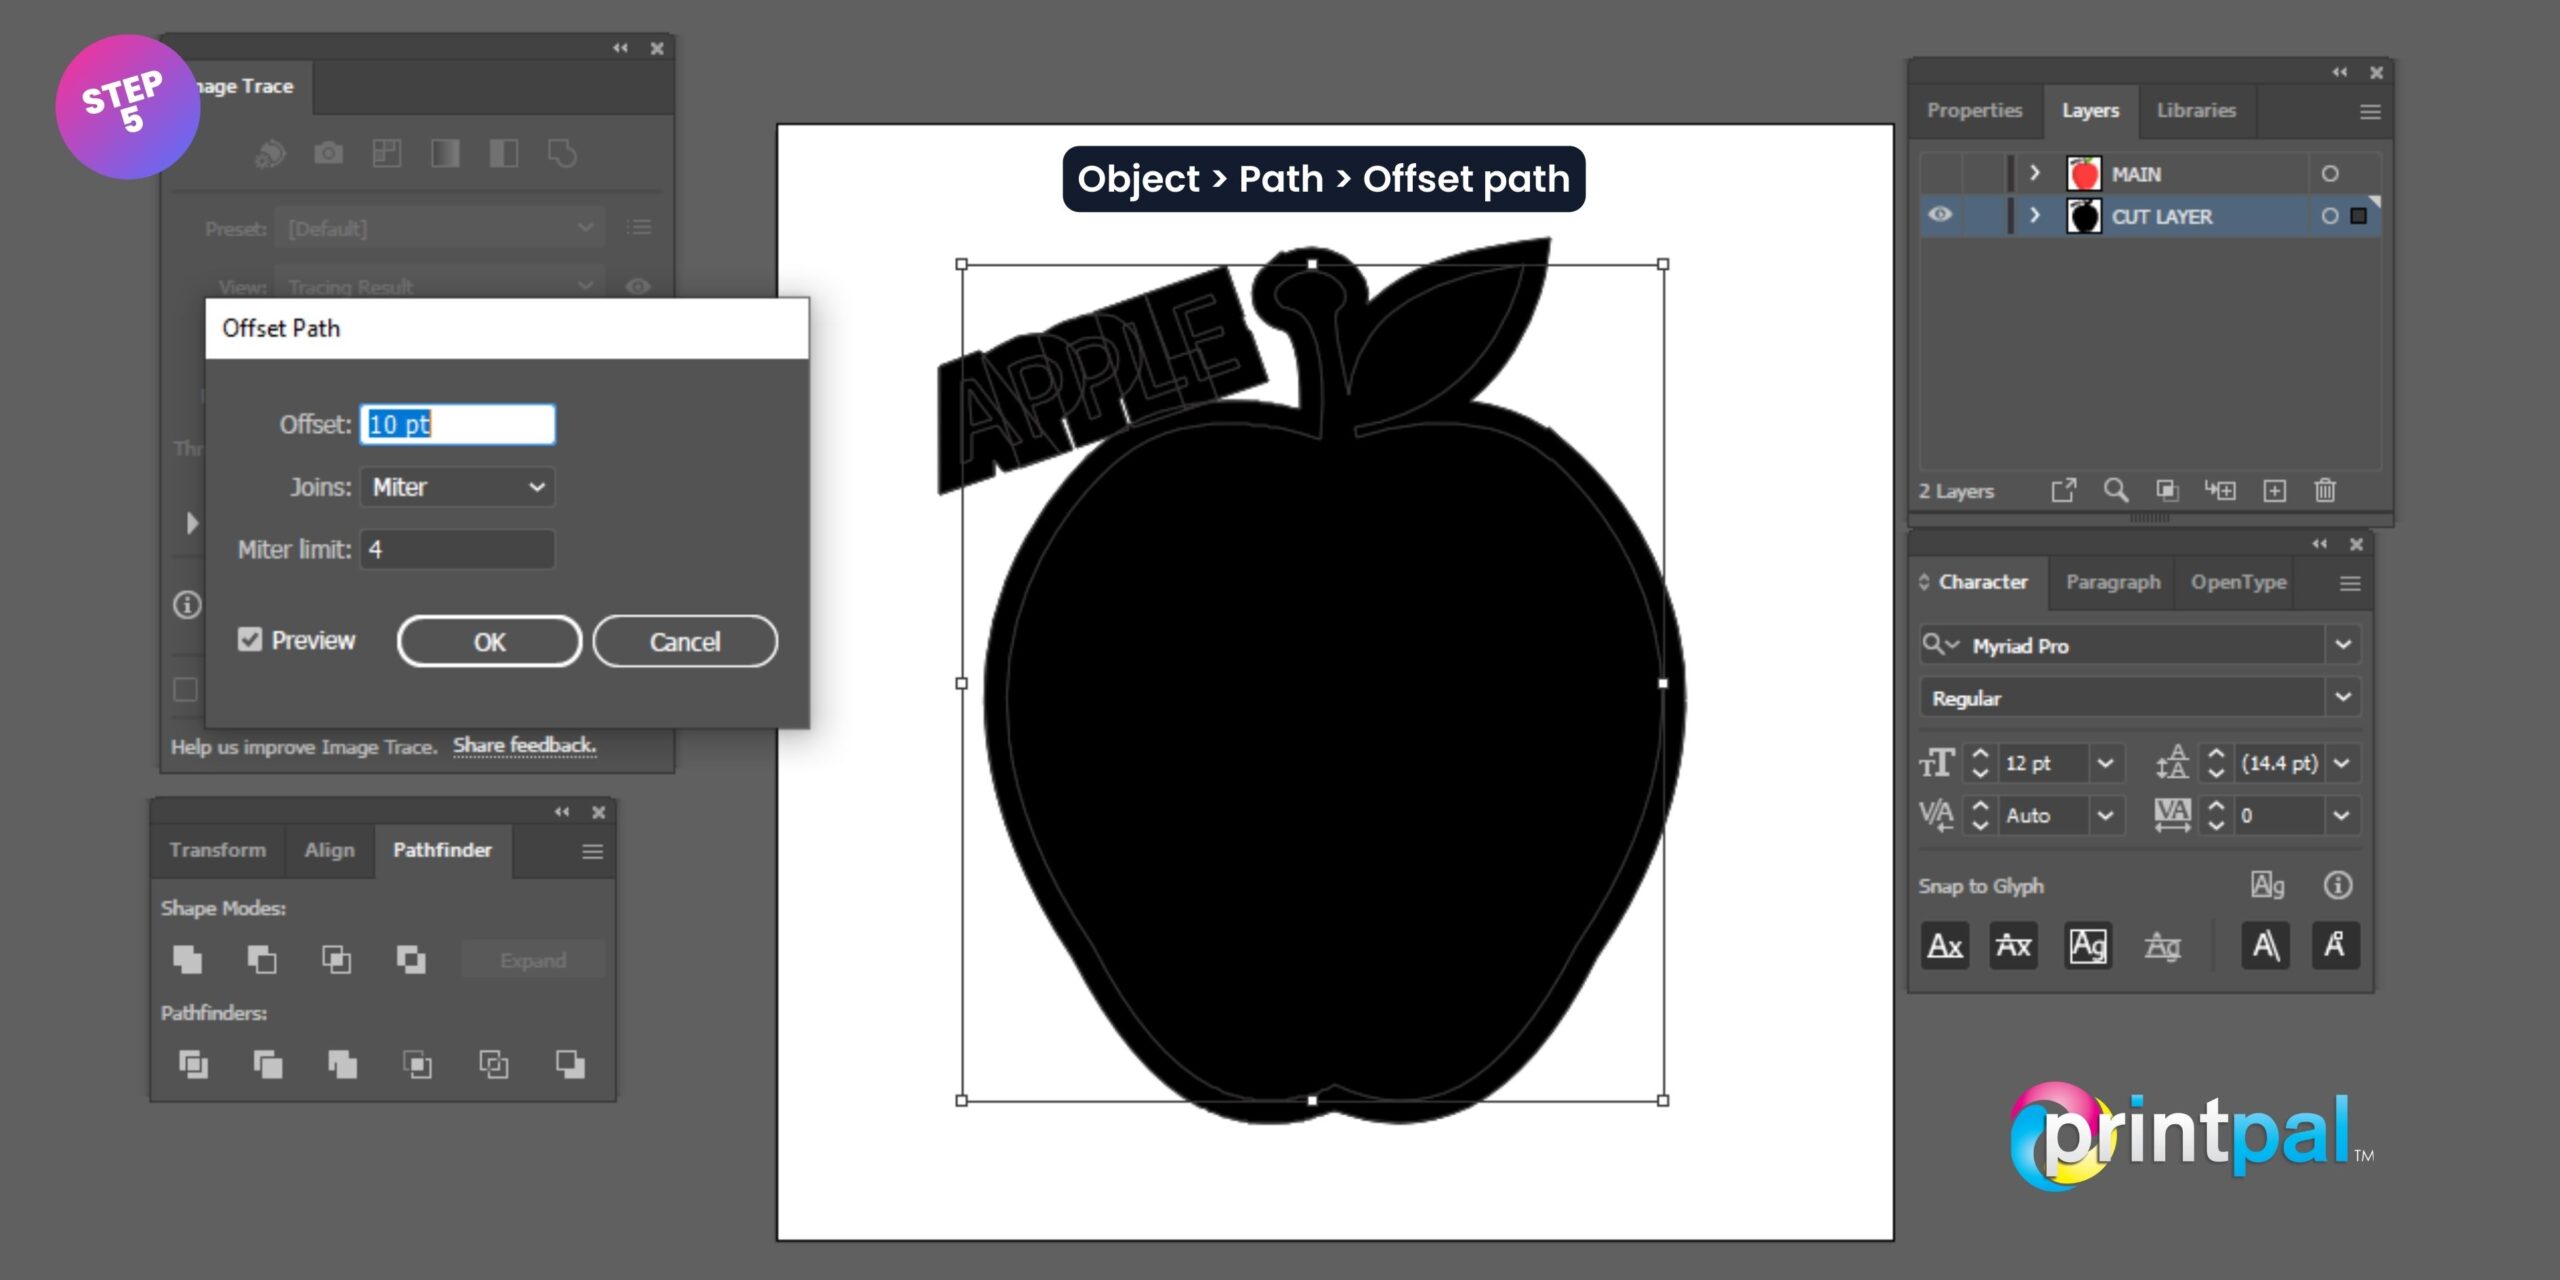
  • While the shape is still selected,
  • Navigate to the Object menu and select Offset path from the Path submenu.
  • Make sure the Preview box is checked when the Offset path panel is open. You can change the amount of the Offset until you are satisfied with the size of the border, and then press the OK button.
Vector Cut Contour Step 5 scaled

Step 6

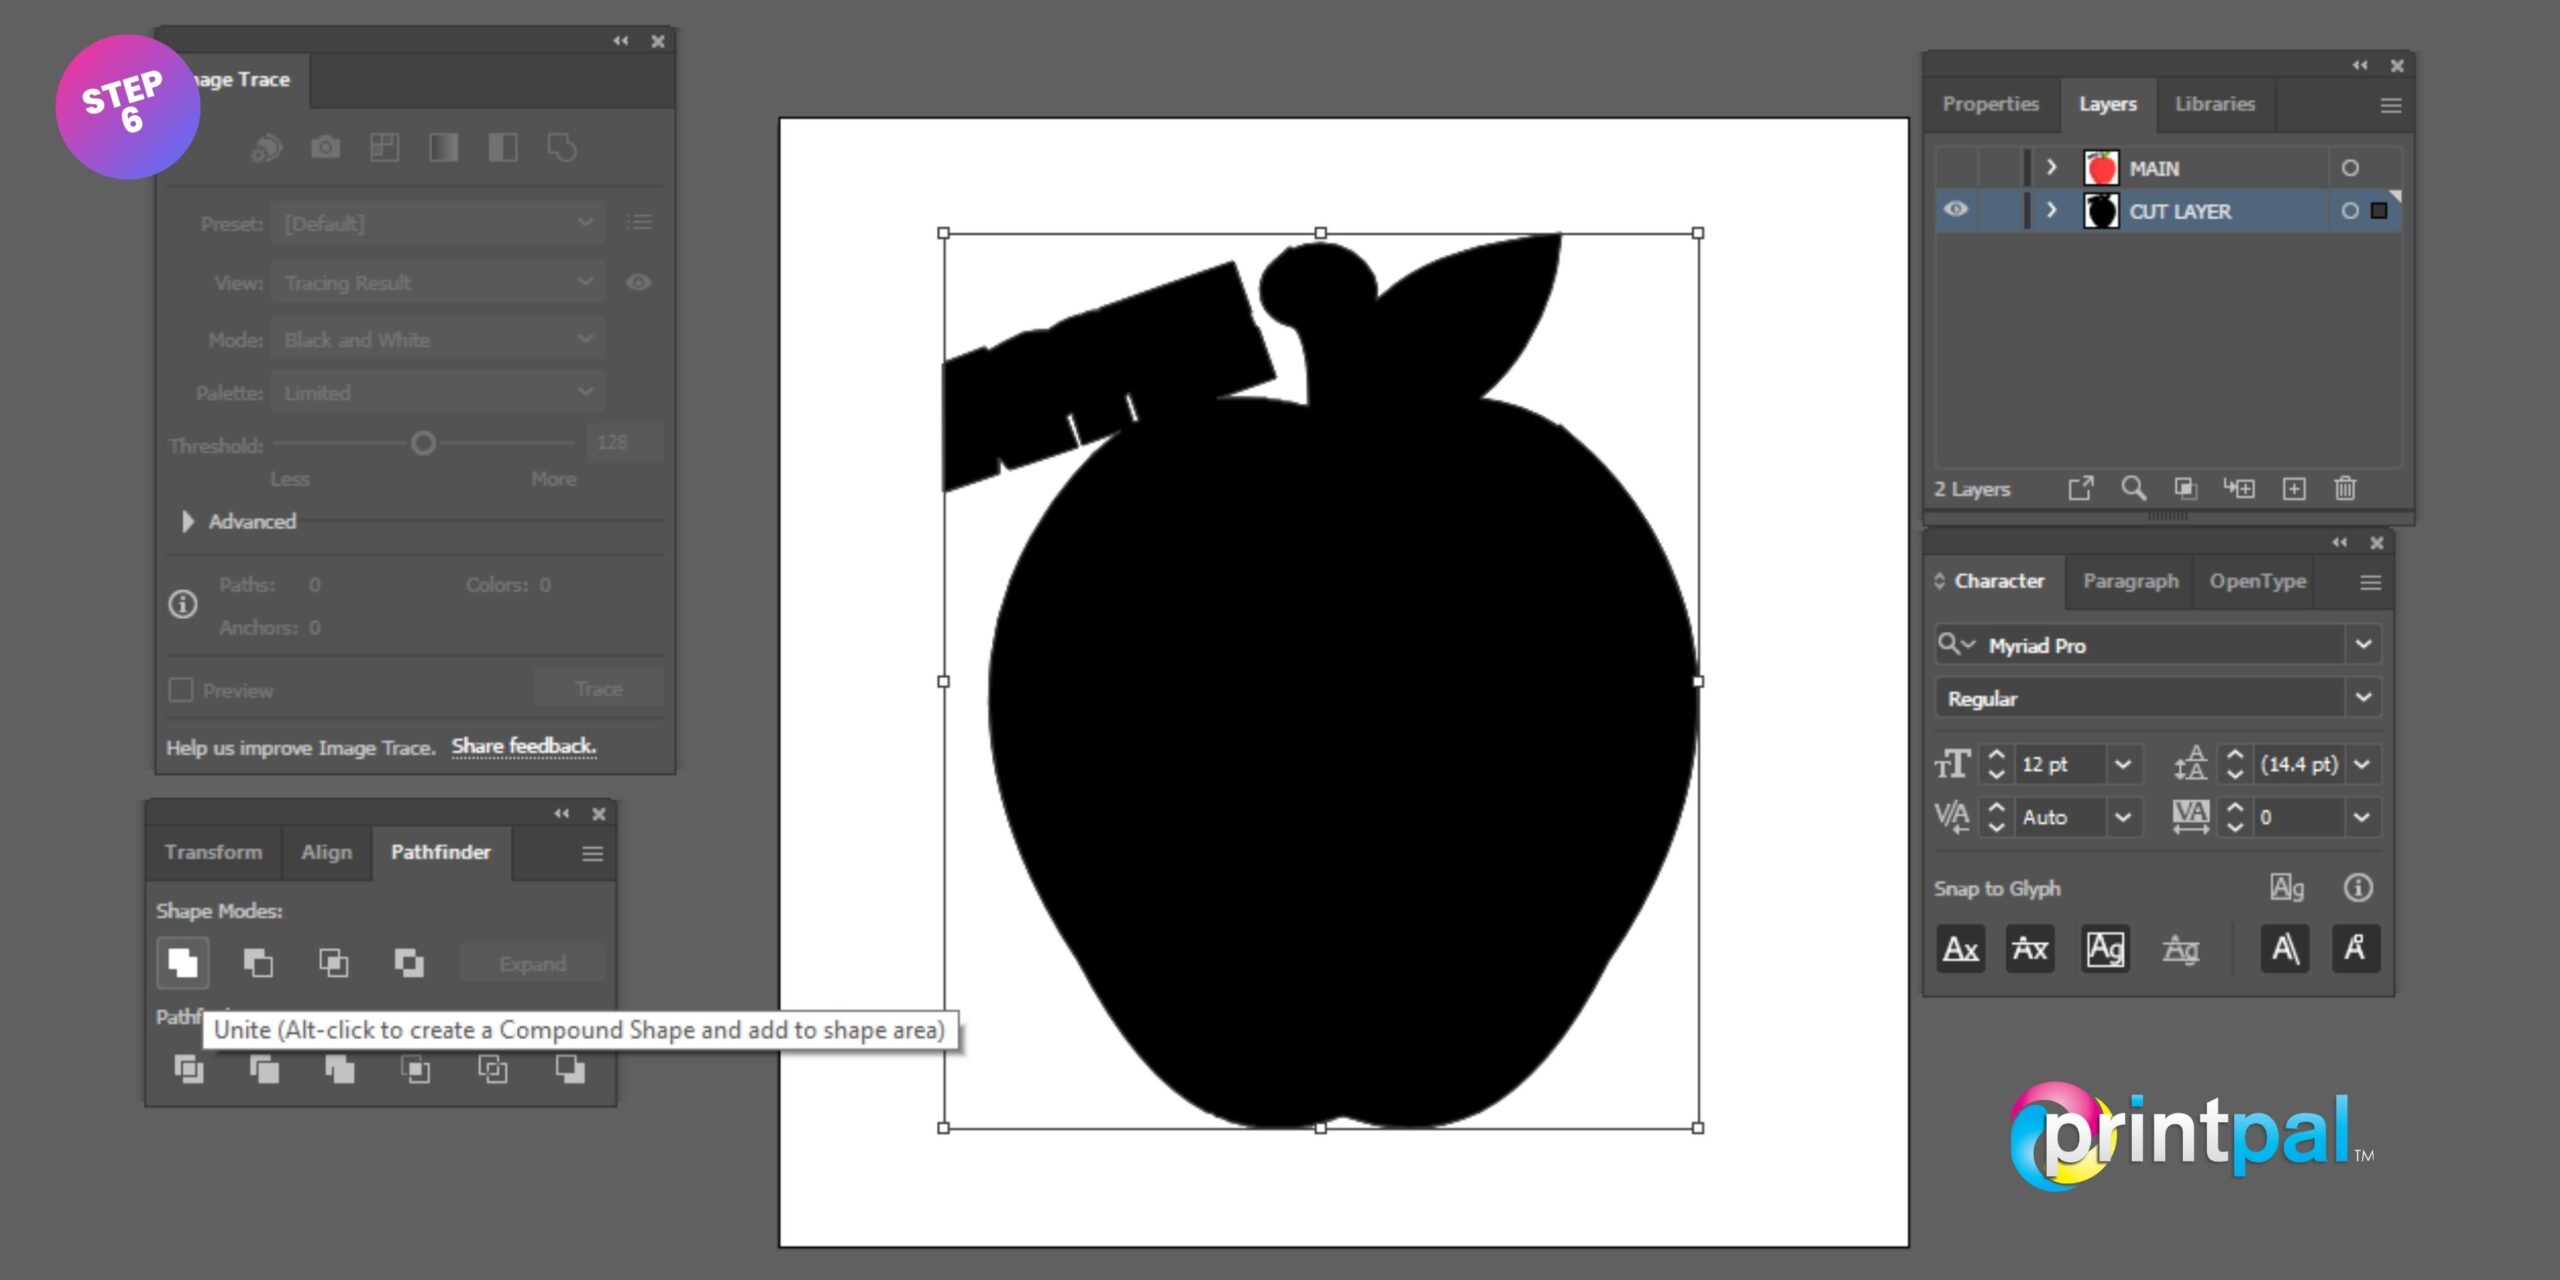
  • Once more, pick everything that is on the cut line layer, and then select Unite from the drop-down menu in the Pathfinder window.
  • Remove any undesired holes from your shape by using the Direct selection tool (A), which is located in the Tools menu.
Vector Cut Contour Step 6 scaled

Step 7

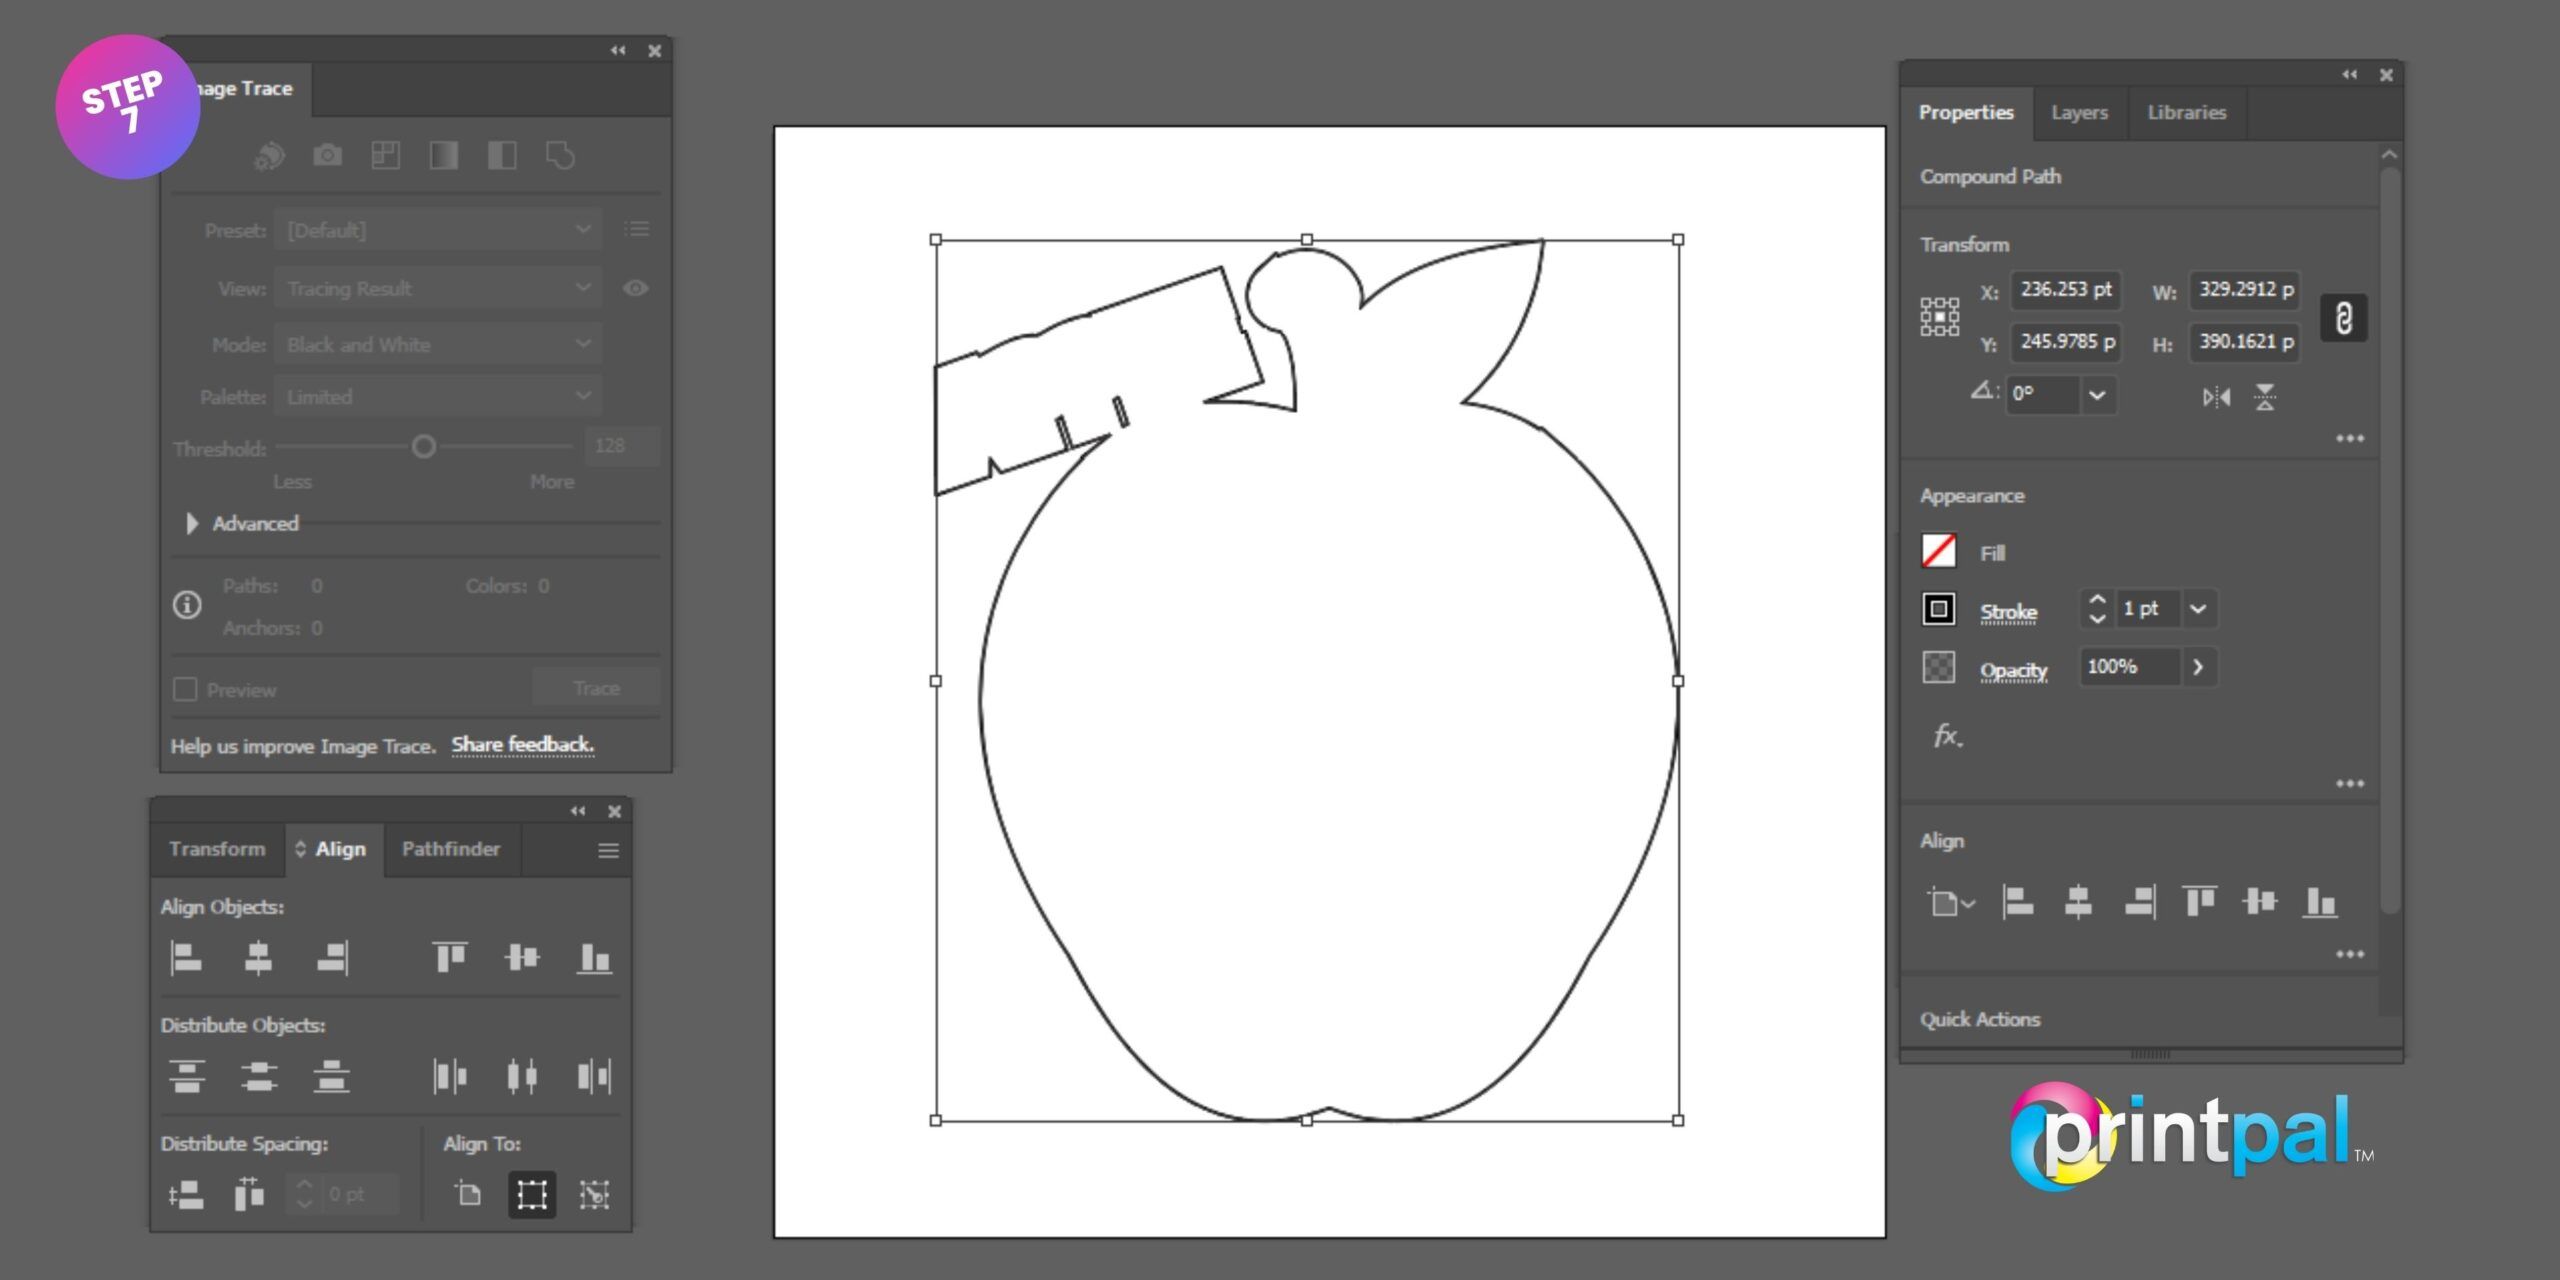
  • Remove the fill from the selected shape, then give it a stroke of 1 point size.
  • This is the typical format that we would like your unique artwork in; let us know if you need any assistance. There won’t be any issues at all; simply inform our crew about it when you send in your artwork.
Vector Cut Contour Step 7 scaled

Step 8

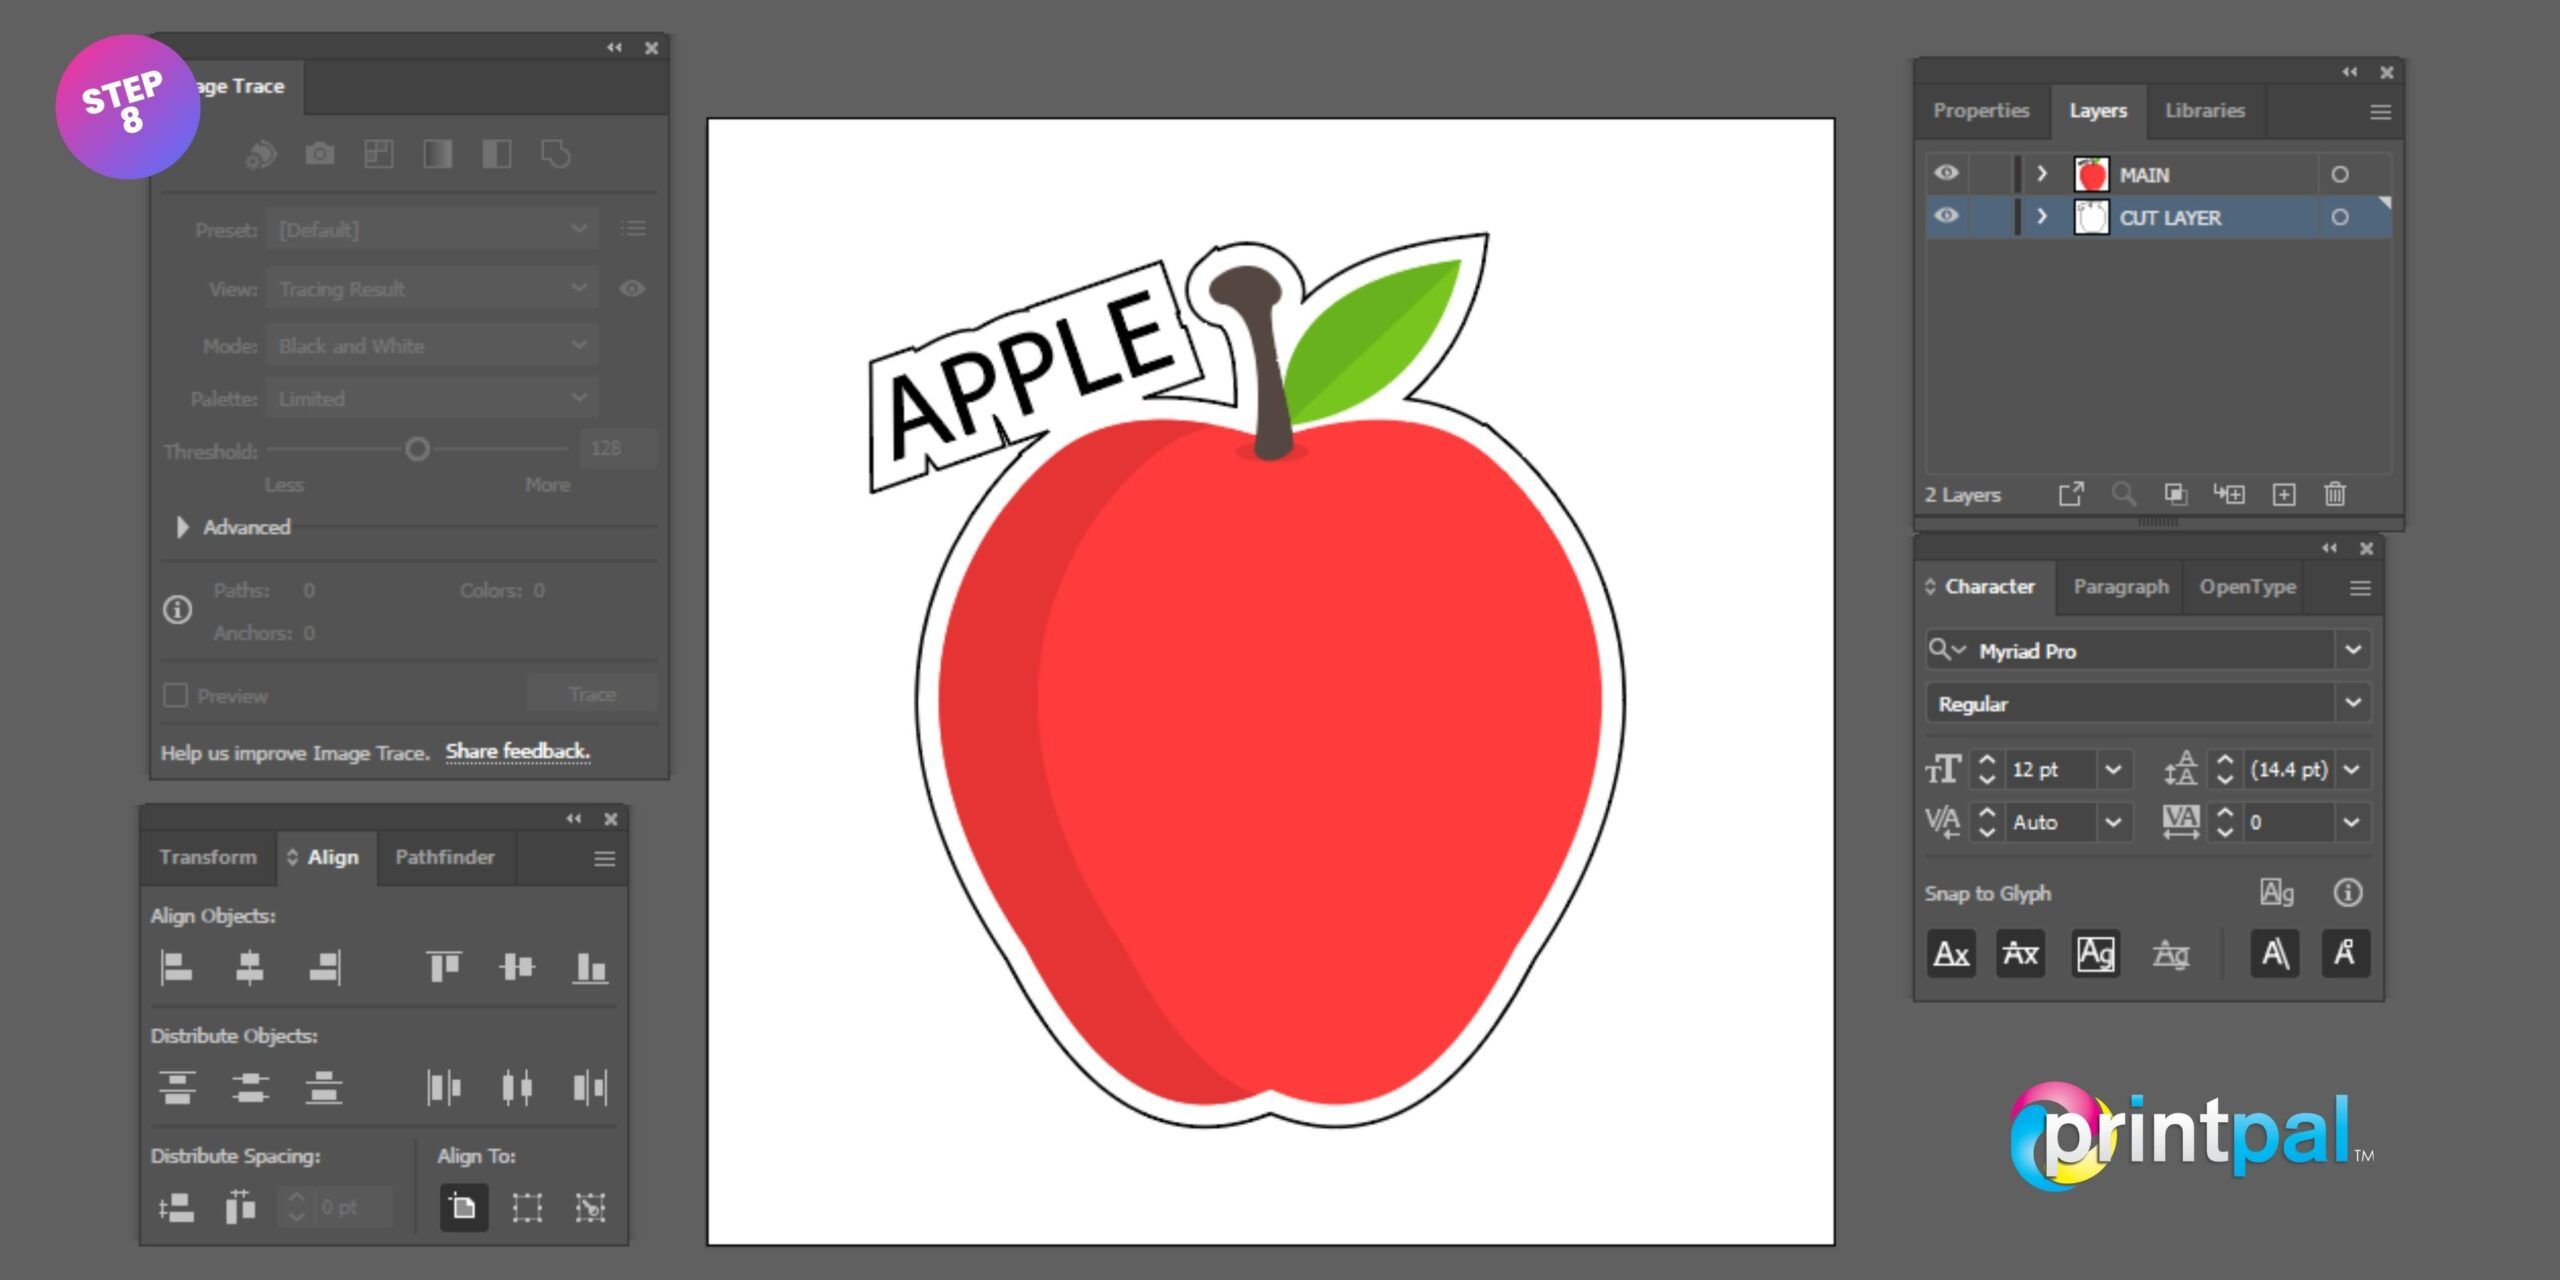
  • In the event that you find yourself with two or more cut line objects, you will have to connect them using a bridge in order to produce a single shape.
  • Create a new shape that extends beyond the boundaries of the current items by making use of the Pen tool (P). The next step is to select Unite from the Pathfinder window while you still have all of the items selected.
  • After you have completed adding cut lines, simply save the file you are working on in Illustrator, and you will be finished.
  • All artwork is manually checked by our team so if anything pops up we will be in contact immediately.
Vector Cut Contour Step 8 scaled

Raster Images (.png, .jpg, .jpeg, .gif, .tiff, .psd)

Step 1

  • Launch Adobe Illustrator and bring up your design.
  • In the panel labelled “Layers,” press and hold the Option key (on a Mac) or the Alt key (on a PC), and then drag the layer your artwork is now on to sit on top of itself.
Raster Images Cut Contour 1 scaled

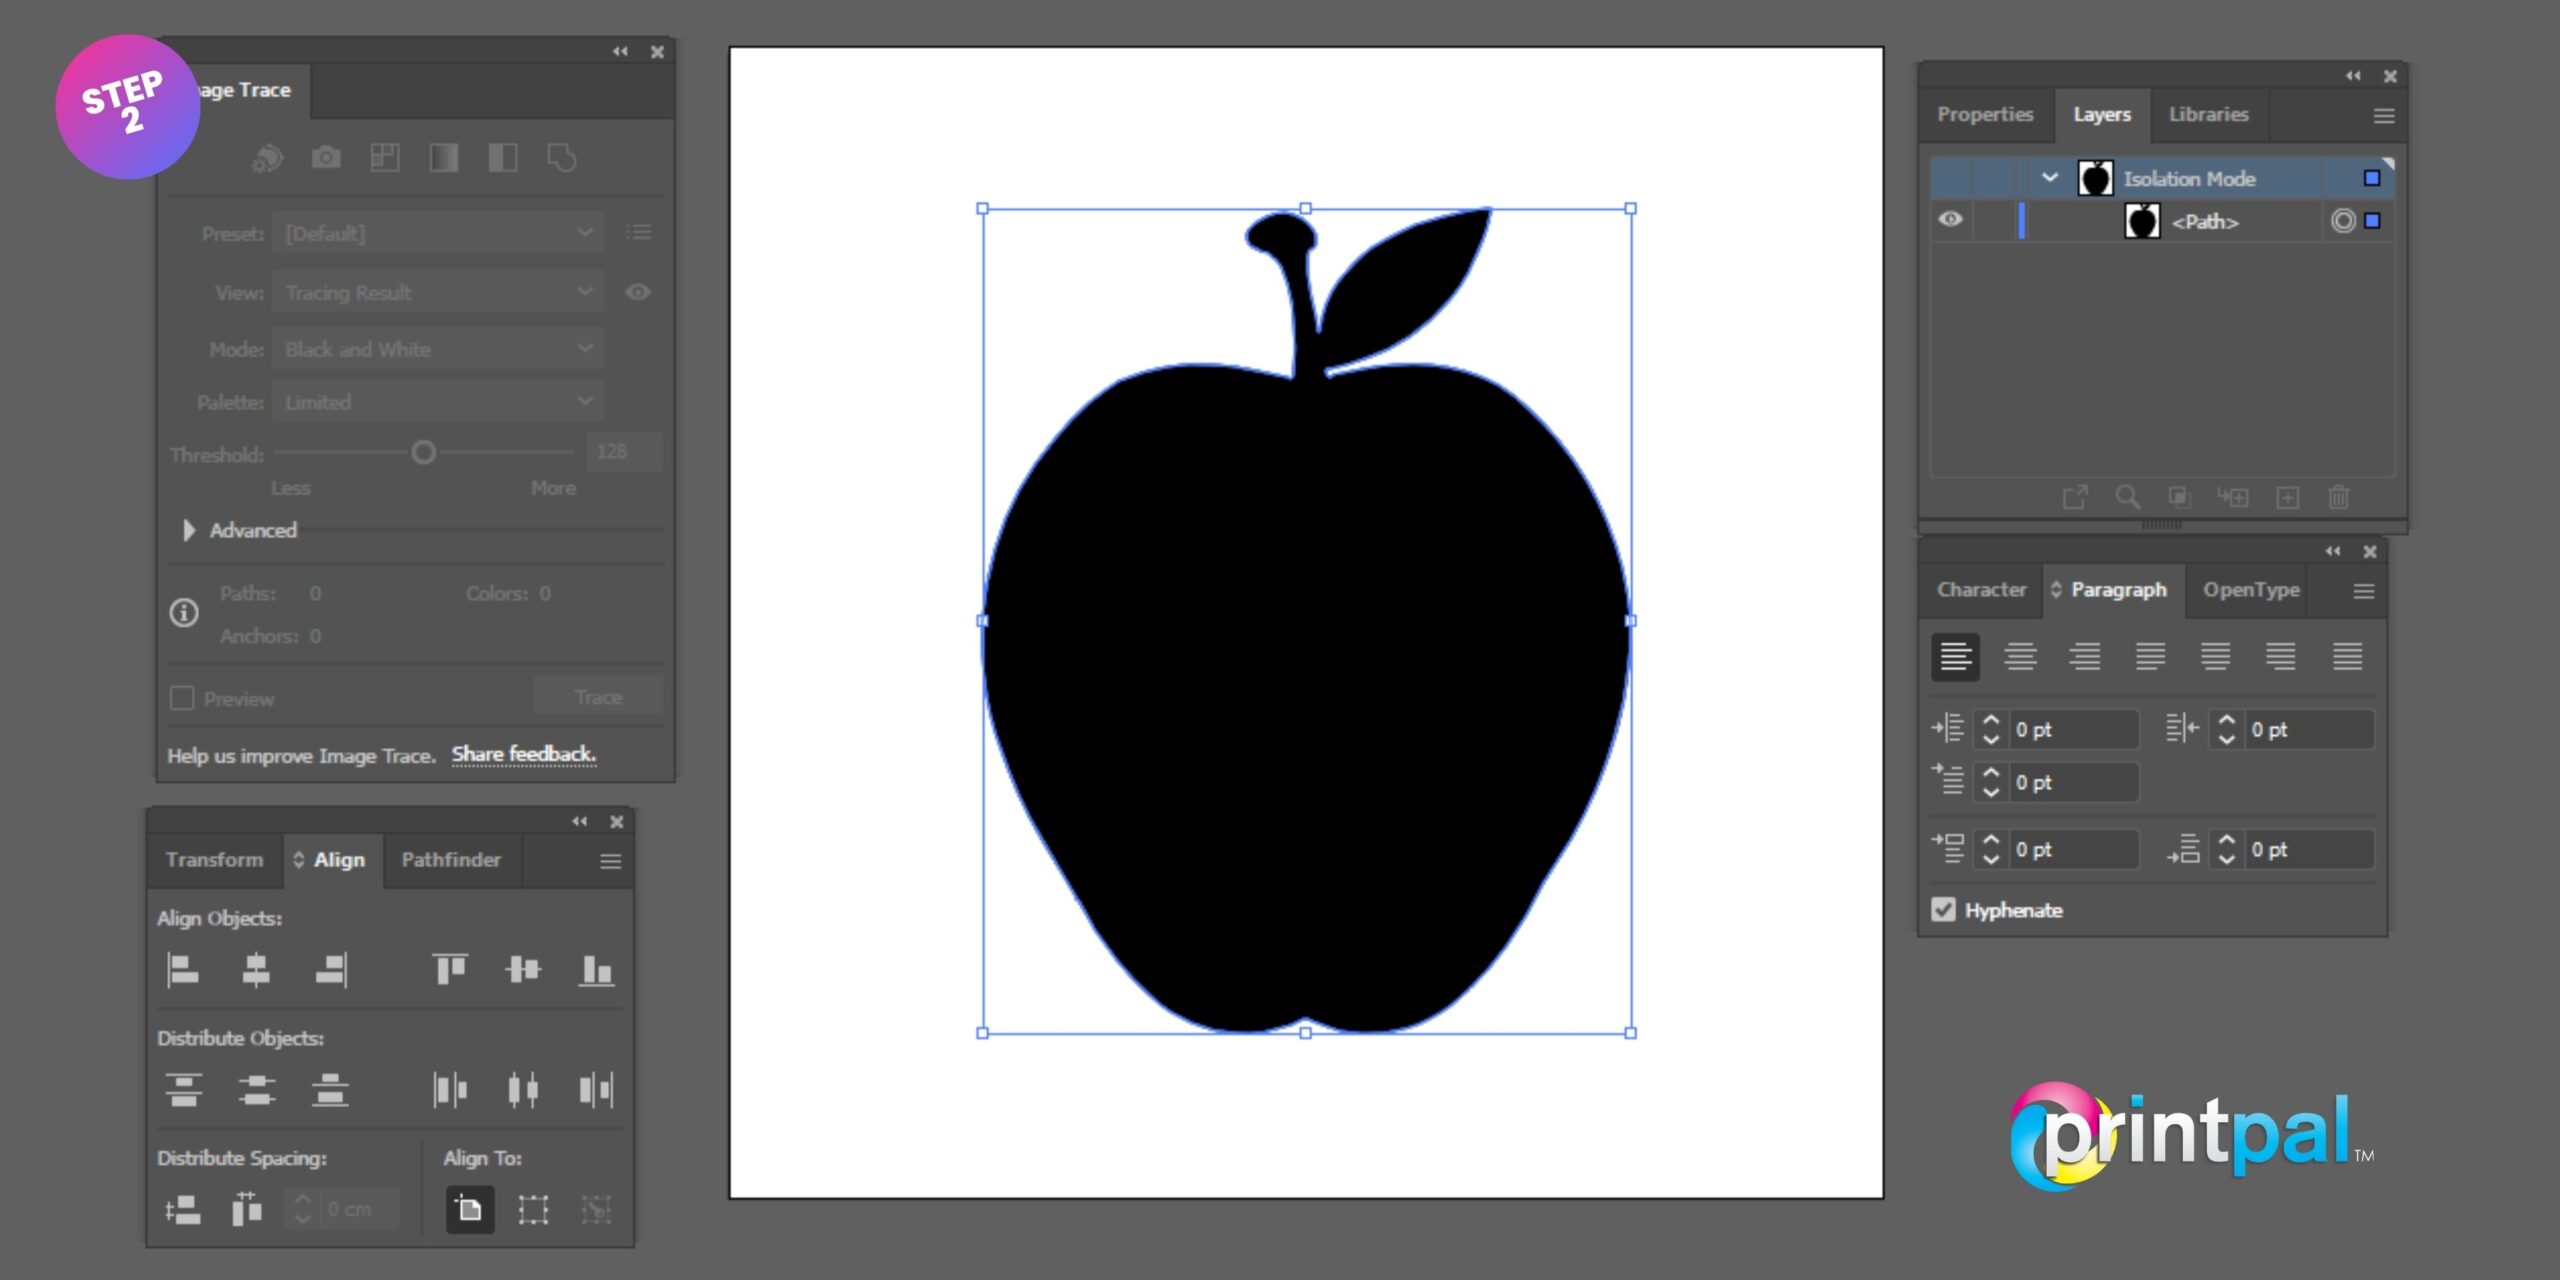
Step 2

  • Utilizing the Image trace window while your image is selected will result in the creation of a vector representation of your image.
  • During this stage, you don’t need to worry about colours or minute details. The only thing that really counts is making sure that the perimeter of the shape matches the design you started with.
  • Click the Expand button when it appears to be correct. A vector shape will be produced as a result.
Raster Images Cut Contour 2 scaled

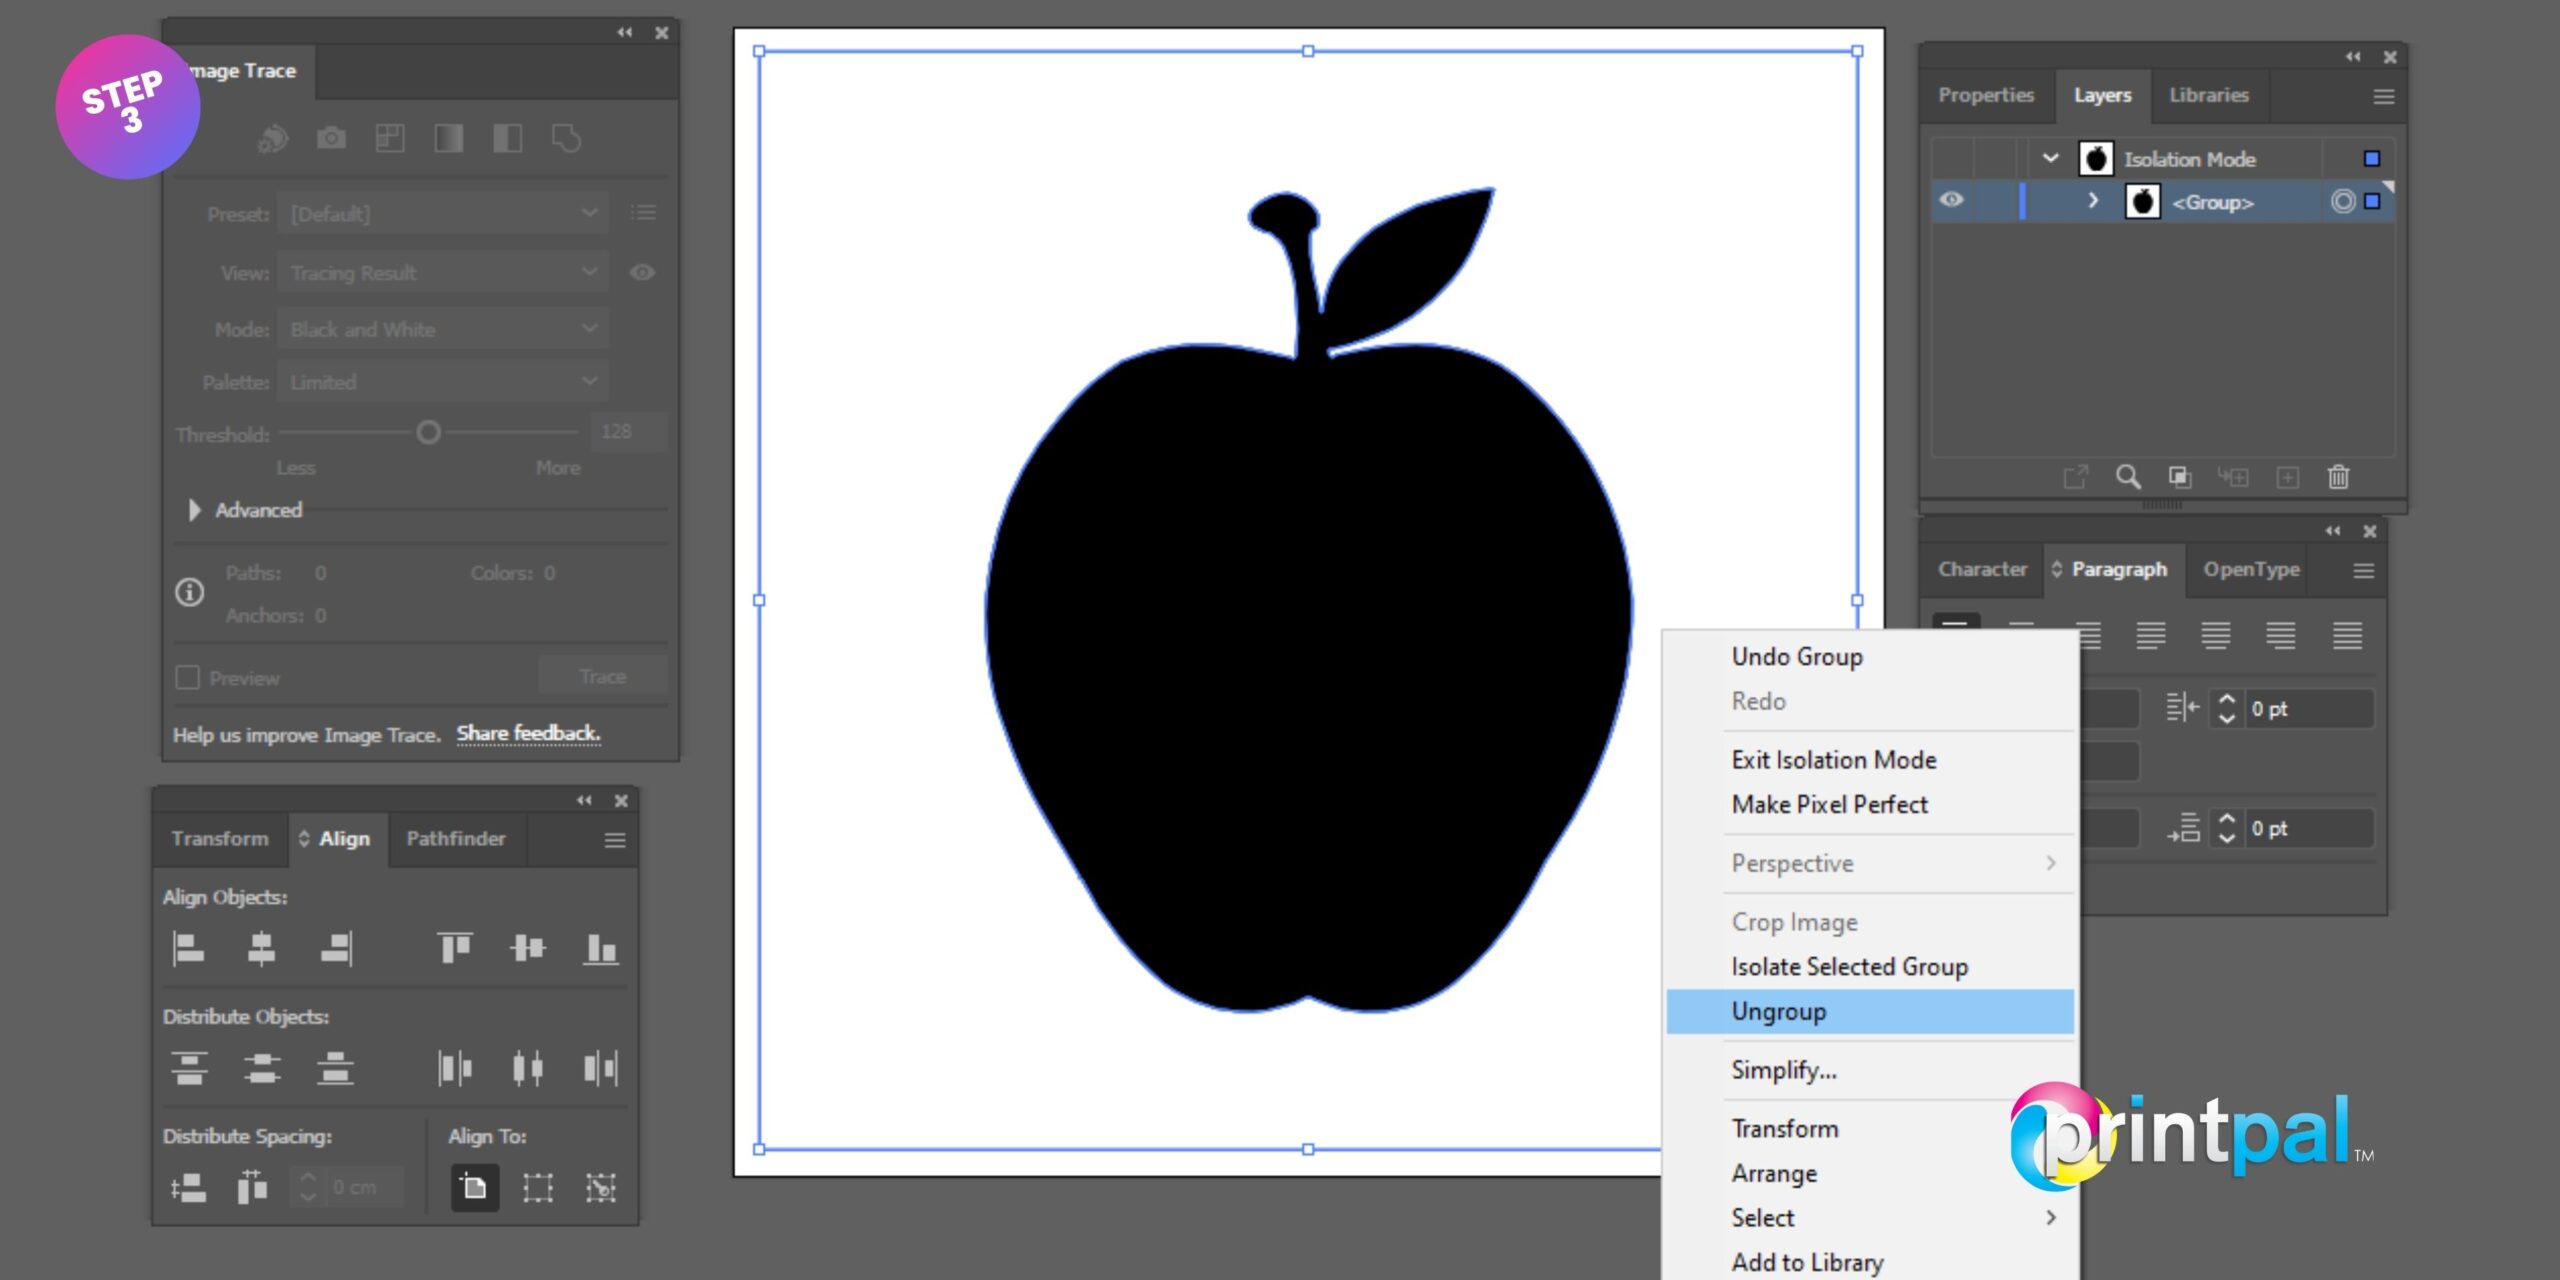
Step 3

  • Illustrator will frequently generate a white bounding area around your design; you should delete this.
  • To get rid of it, right-click on your design and select the Ungroup option from the context menu. Tap the Delete button after selecting the bounding box.
Raster Images Cut Contour 3 scaled

Step 4

  • Select everything on the layer containing the cut line.
  • To convert the entire picture into a single form, choose the Unite icon within the Pathfinder window.
Vector Cut Contour Step 4 scaled

Step 5

  • While the shape is still selected,
  • Navigate to the Object menu and select Offset path from the Path submenu.
  • Make sure the Preview box is checked when the Offset path panel is open. You can change the amount of the Offset until you are satisfied with the size of the border, and then press the OK button.
Vector Cut Contour Step 5 scaled

Step 6

  • Once more, pick everything that is on the cut line layer, and then select Unite from the drop-down menu in the Pathfinder window.
  • Remove any undesired holes from your shape by using the Direct selection tool (A), which is located in the Tools menu.
Vector Cut Contour Step 6 scaled

Step 7

  • Remove the fill from the selected shape, then give it a stroke of 1 point size.
  • This is the typical format that we would like your unique artwork in; let us know if you need any assistance. There won’t be any issues at all; simply inform our crew about it when you send in your artwork.
Vector Cut Contour Step 7 scaled

Step 8

  • In the event that you find yourself with two or more cut line objects, you will have to connect them using a bridge in order to produce a single shape.
  • Create a new shape that extends beyond the boundaries of the current items by making use of the Pen tool (P). The next step is to select Unite from the Pathfinder window while you still have all of the items selected.
  • After you have completed adding cut lines, simply save the file you are working on in Illustrator, and you will be finished.
  • All artwork is manually checked by our team so if anything pops up we will be in contact immediately.
Vector Cut Contour Step 8 scaled